Ginger WP Theme Documentation
- Getting Started
- Installation
- Setup
- Recommended Plugins
- Customization
- Child Theme
- Theme Options
- Post/Page Metaboxes
- Translate Your Theme
- Miscellaneous
- Page Transitions
- Troubleshooting
- Google Maps
- Helper Css Classes
- Videos
- Install Theme
- Demo Setup
Getting Started
Thank you for choosing Ginger - we truly appreciate that! Before you start setting up your website, please read through this documentation.
Installation
Ginger theme does not support WordPress version earlier than 4.0 so make sure you've got the current version of WordPress. In order to download the current version, please visit wordpress.org. Please check WordPress Codex for information on how to install WordPress on your server.
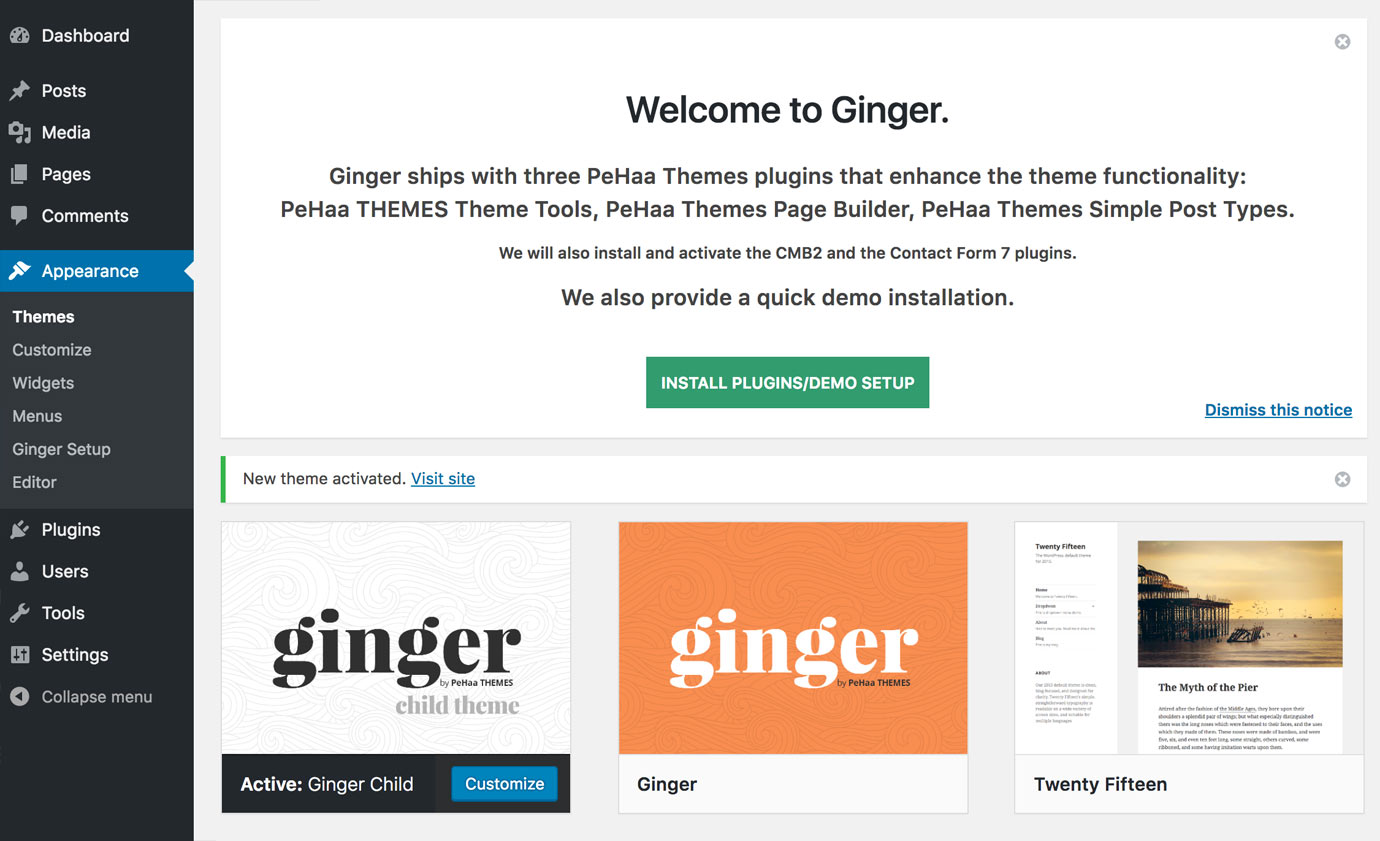
Once WordPress is successfully installed, you will have to upload the theme to your WordPress directory. We highly recommend activating the Ginger's child theme instead of Ginger itself. That means you will have to install two themes: ginger and ginger-child.
Download and unzip the ginger-package folder. You'll find two zipped theme folders ginger.zip and ginger-child.zip.
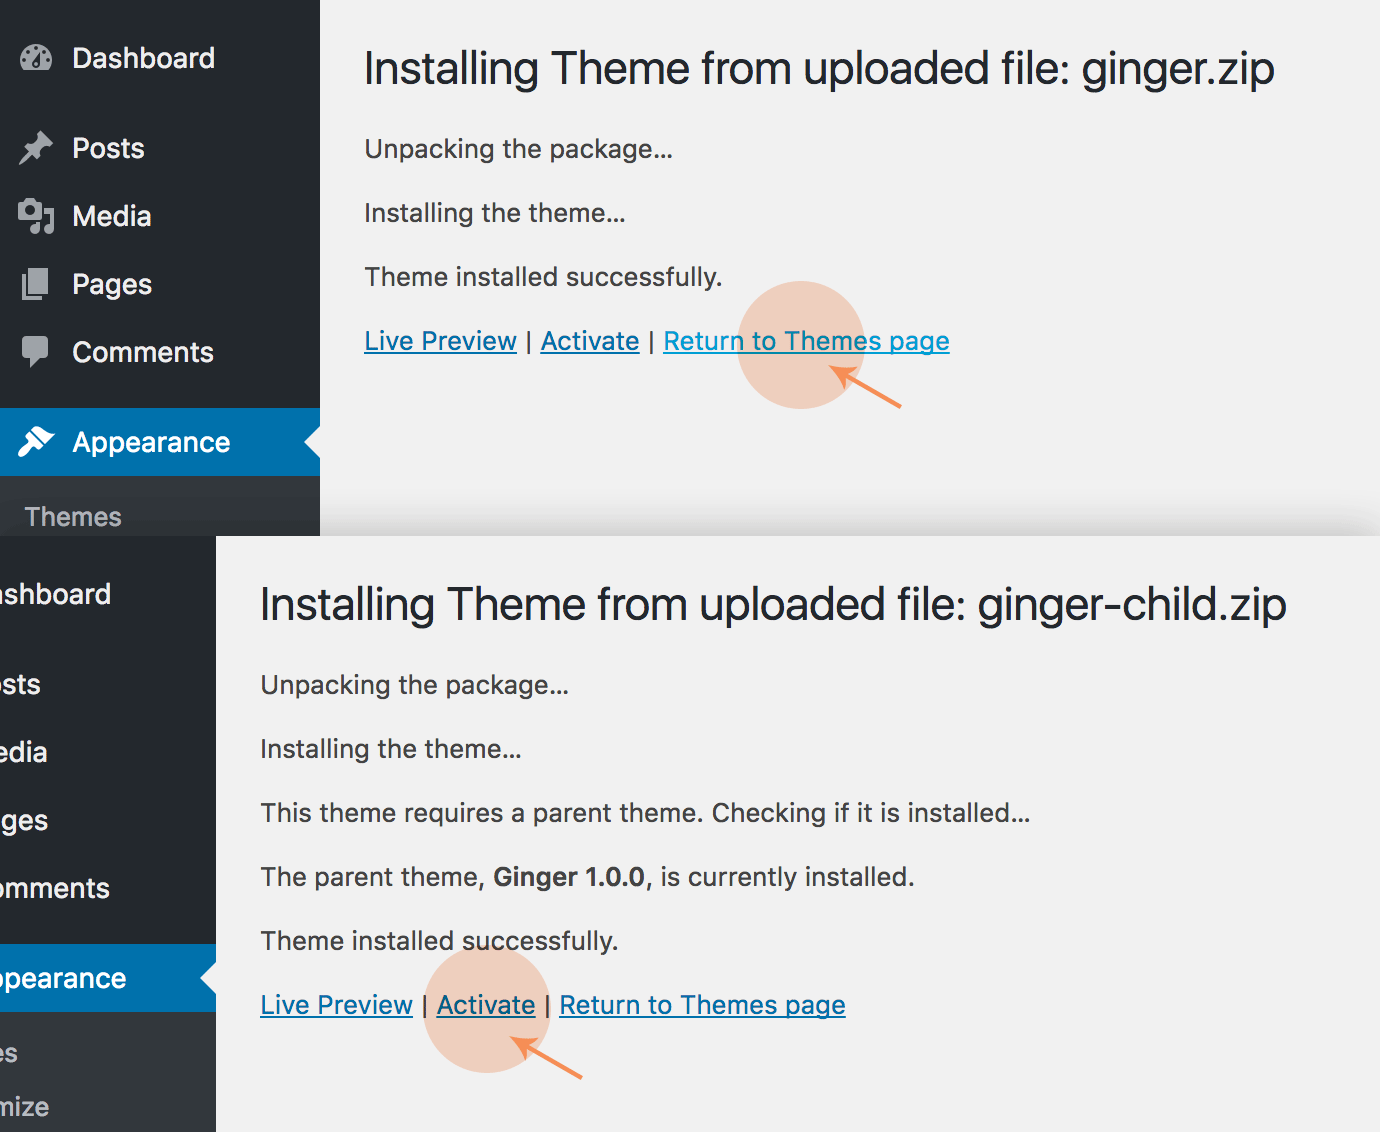
Open your WordPress dashboard. Go to Appearance > Themes. Click the Add New Theme button, then Upload Theme and select the ginger.zip file. Click Install Now.

Don’t activate the theme yet. Repeat the upload/install process for with the ginger-child.zip file and activate the ginger-child theme once installed.
Ginger Installation - Video
Setup
Once activated, Ginger will display a Welcome Screen sending you to the Ginger Setup page (you can also access it in Appearance > Ginger Setup).
You can choose between installing and activating recommended plugins or installing, activating, configuring for the demo and importing the demo data.
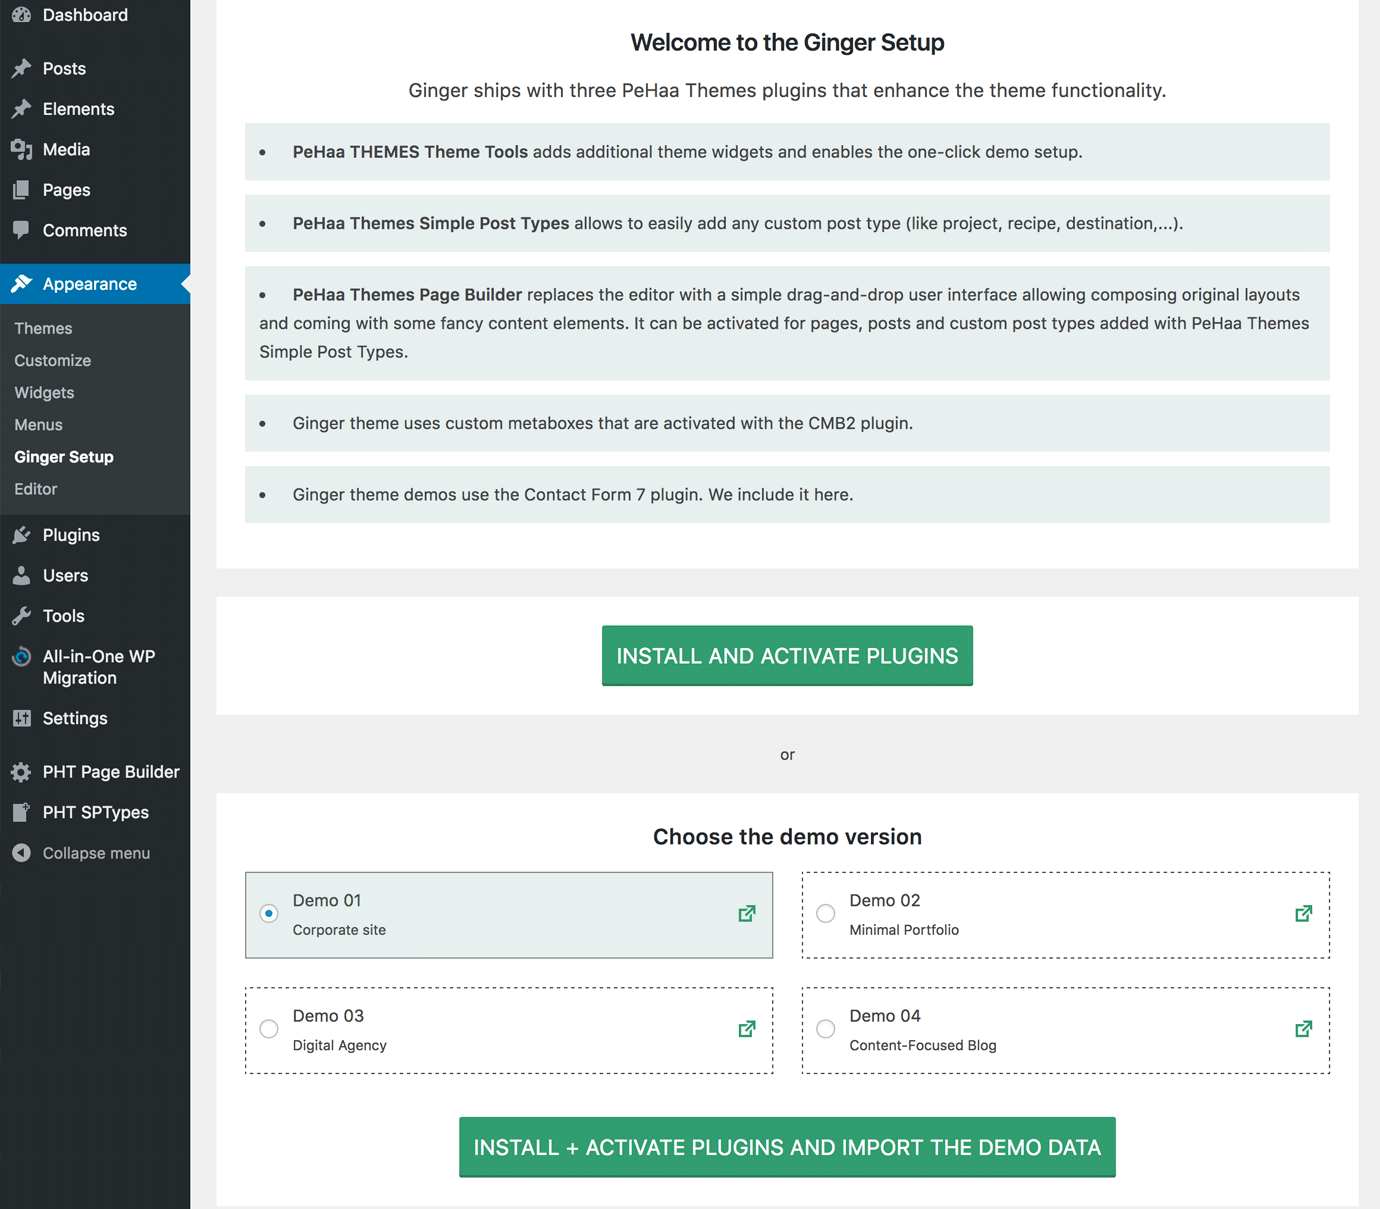
If you choose Install and Activate Plugins the following plugins will be installed and activated:
- PeHaa Themes Simple Post Types
- PeHaa Themes Page Builder
- PeHaa THEMES Theme Tools
- CMB2 (Custom Metaboxes and Fields by WebDevStudios)
- Contact Form 7
Please note that in this case no plugin configuration is done. All installed and activated plugins run with their default options.
If you choose Install + Activate Plugins and Import the Demo Data the plugins listed above will be installed and activated. PeHaa Themes Page Builder will be activated on pages and projects.
The demo data is imported from:
- Demo 01 - a corporate site with three one-page home page variants, multiple portfolio layouts, single project layout, team page, staff member page, contact page and blog wptemplates.pehaa.com/gingr-01/
- Demo 02 - a minimal portfolio site with three home page variants (portfolio, video header and one page personal v-card), single project layout, contact page and blog wptemplates.pehaa.com/gingr-02/
- Demo 03 - a digital agency site with three home page variants (projects as panes, one-page and video header), portfolio page, single project layout, contact page and blog wptemplates.pehaa.com/gingr-03/
- Demo 04 - a content-focused blog with three home page variants (one column blog, three and two columns masonry blogs), gallery page, contact page, and single post layout wptemplates.pehaa.com/gingr-04/
Ginger Setup - Video
Recommended Plugins
Ginger theme setup recommends the installation of:
- PeHaa THEMES Theme Tools
- PeHaa Themes Simple Post Types
- PeHaa Themes Page Builder
- CMB2 (Custom Metaboxes and Fields by WebDevStudios)
- Contact Form 7
Note that none of these plugins is strictly necessary and if you don’t install them or deactivate any of them Ginger will still be fully functional.
PeHaa THEMES Theme Tools
First of all PeHaa THEMES Theme Tools enables the one-click installation of the demos. It also registers two additional custom widgets, Ginger About Widget and Ginger Recent Posts with Thumbnails.
PeHaa THEMES Theme Tools adds two useful shortcodes:
[pht-get-the-tag-list]
that displays the tags attached to the current post and
[pht-post-navigation]
that displays the links to the next and previous post/custom post type.
PeHaa Themes Page Builder
By default, after the plugin activation, it's activated on Pages. If you want to use it for posts or custom post types added with PHT Simple Post Types go to the PHT Page Builder menu page and check the post types you want to use the page builder for.
PeHaa Themes Simple Post Types
PeHaa Themes Simple Post Types is a simple plugin by PeHaa Themes that allows you add easily custom post types and custom taxonomies. So if posts and pages are not enough and you need projects, recipes, team members or kittens then PHT Simple Post Types is a way to go.
CMB2 - Custom Metaboxes and Fields
You will need this plugin (available in WordPress repository) to manage some additional settings for your posts and custom post types. See the Post/Page Metaboxes section.
Contact Form 7
One of the popular plugins that manages (multiple) contact forms. It's optional, please feel free to use a contact form of your choice.
Customization
Child Theme
Unless you are absolutely sure that you will never ever need to modify any of the theme files you should install and activate a child theme for Ginger.
For your convenience Ginger comes with a ready to use child theme. You’ll find the “ginger-child” folder in the theme package folder as well as a install-ready ginger-child.zip file. Its files structure is as in the image below.
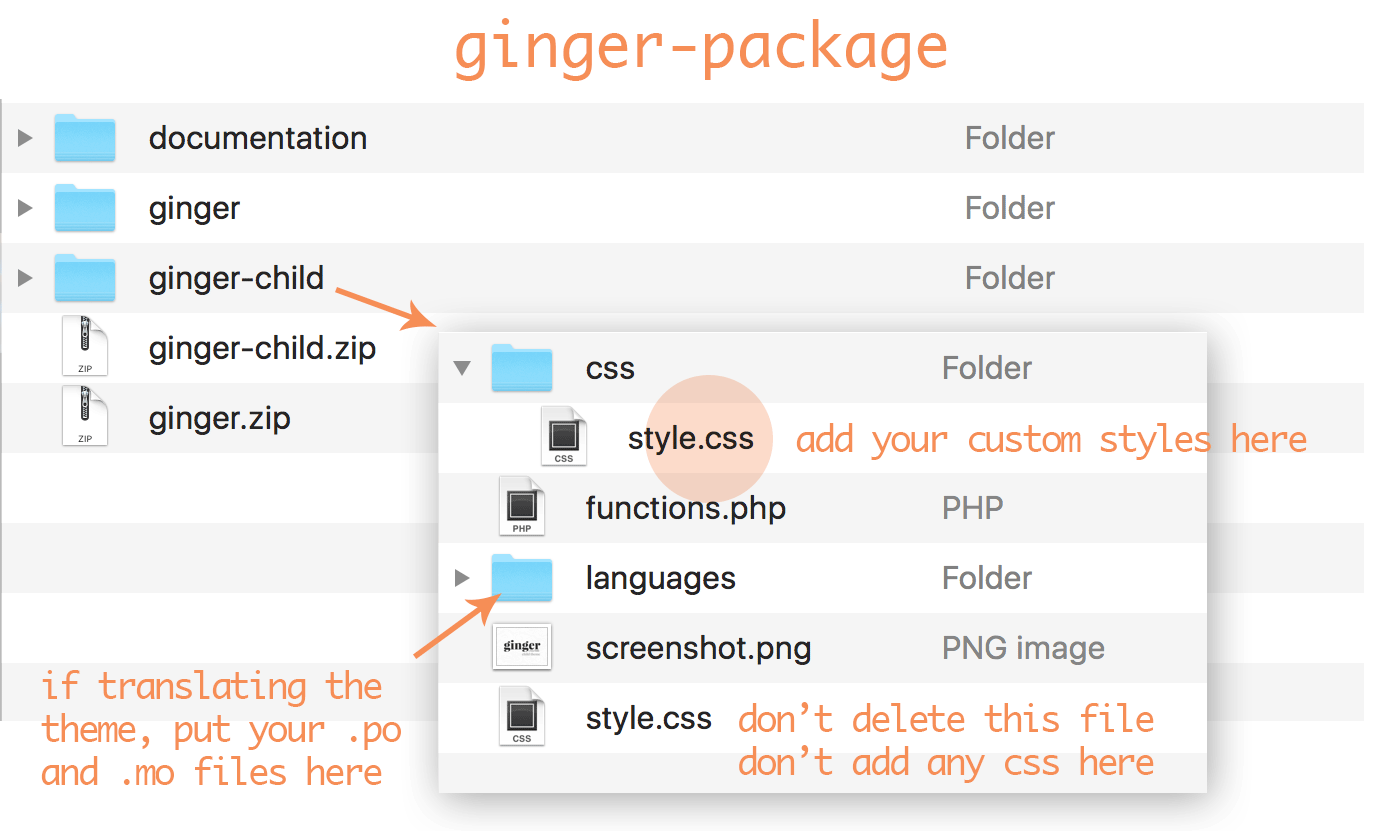
If you want to modify the theme css, you’ll have to edit the css/style.css file. It contains the three lines of code as below. Please note that you should not use “@import”, the parent css is loaded before your custom child css so “@import” is no needed.
/* Theme customization starts here. */
/* DO NOT use "@import". Just type some css that you need to add or override. */
/* Good luck with your project! */
If you are translating your theme (see Translate Your Theme section) you should add your translation files into the languages folder in your child-theme.
Theme Options
With Ginger setting options happens through the WordPress customizer. That means the front-end view and your changes instantly visible – a big advantage from the user perspective.
Important!
All your customization is theme specific and your settings will not be applied if you switch between a child and the parent theme.
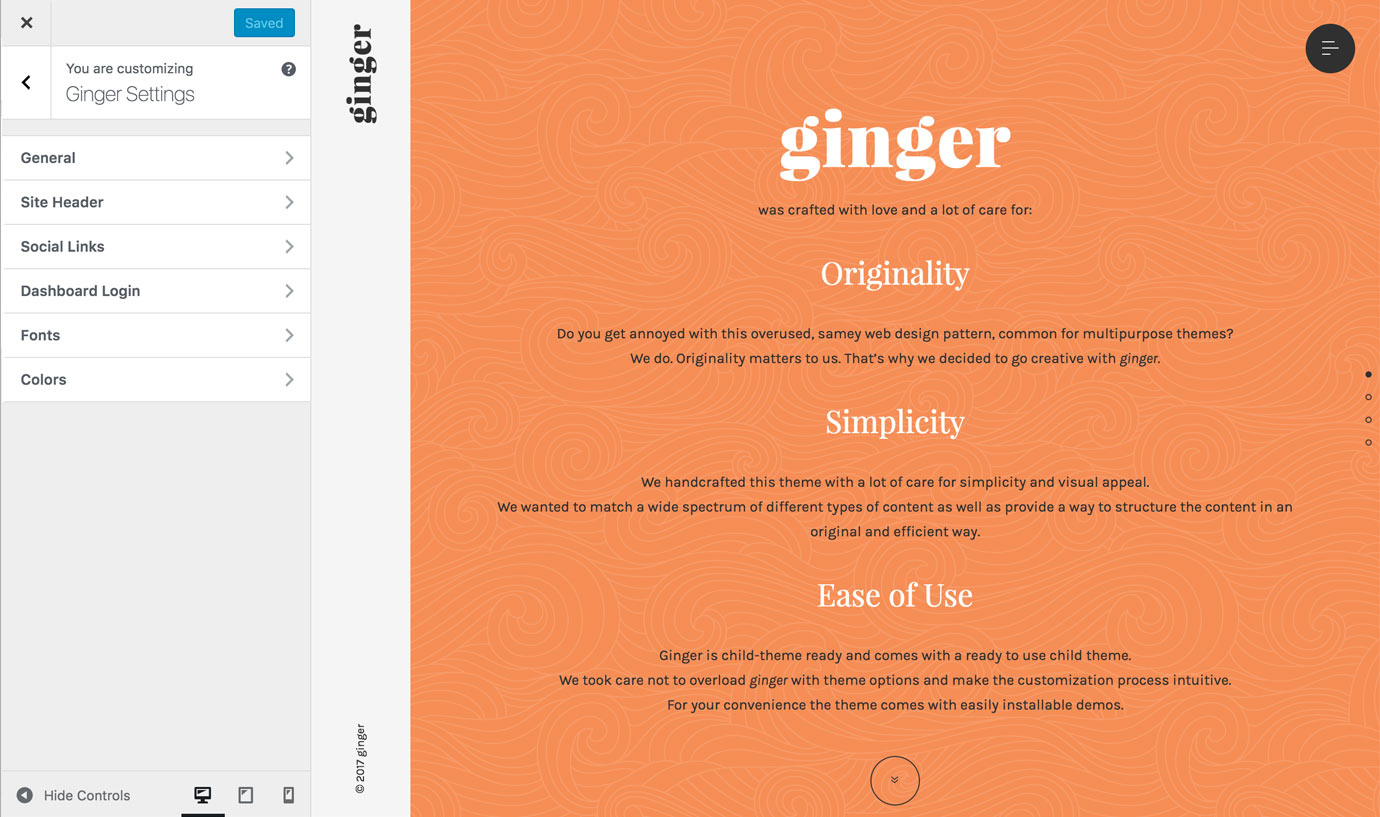 We didn't wanted to overload the Ginger theme with options. They are divided into 6 sub-panels.
-
General
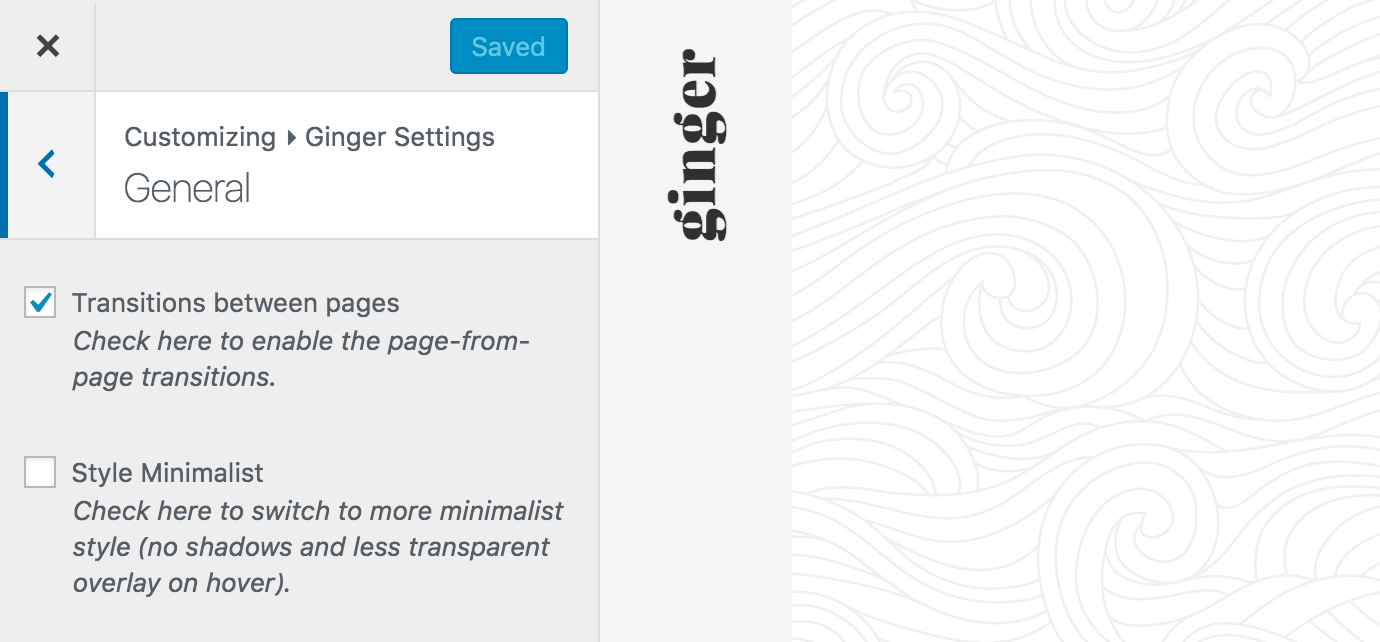
In this panel you can disable the transitions between pages. If disabled you'll get back the normal behavior when changing from one page to another.
You can find more info about the page transitions in the Transitions section.
In this panel you can also opt for simplified styling (we used it in Demo 02 - Minimal Portfolio).
-
Site Header
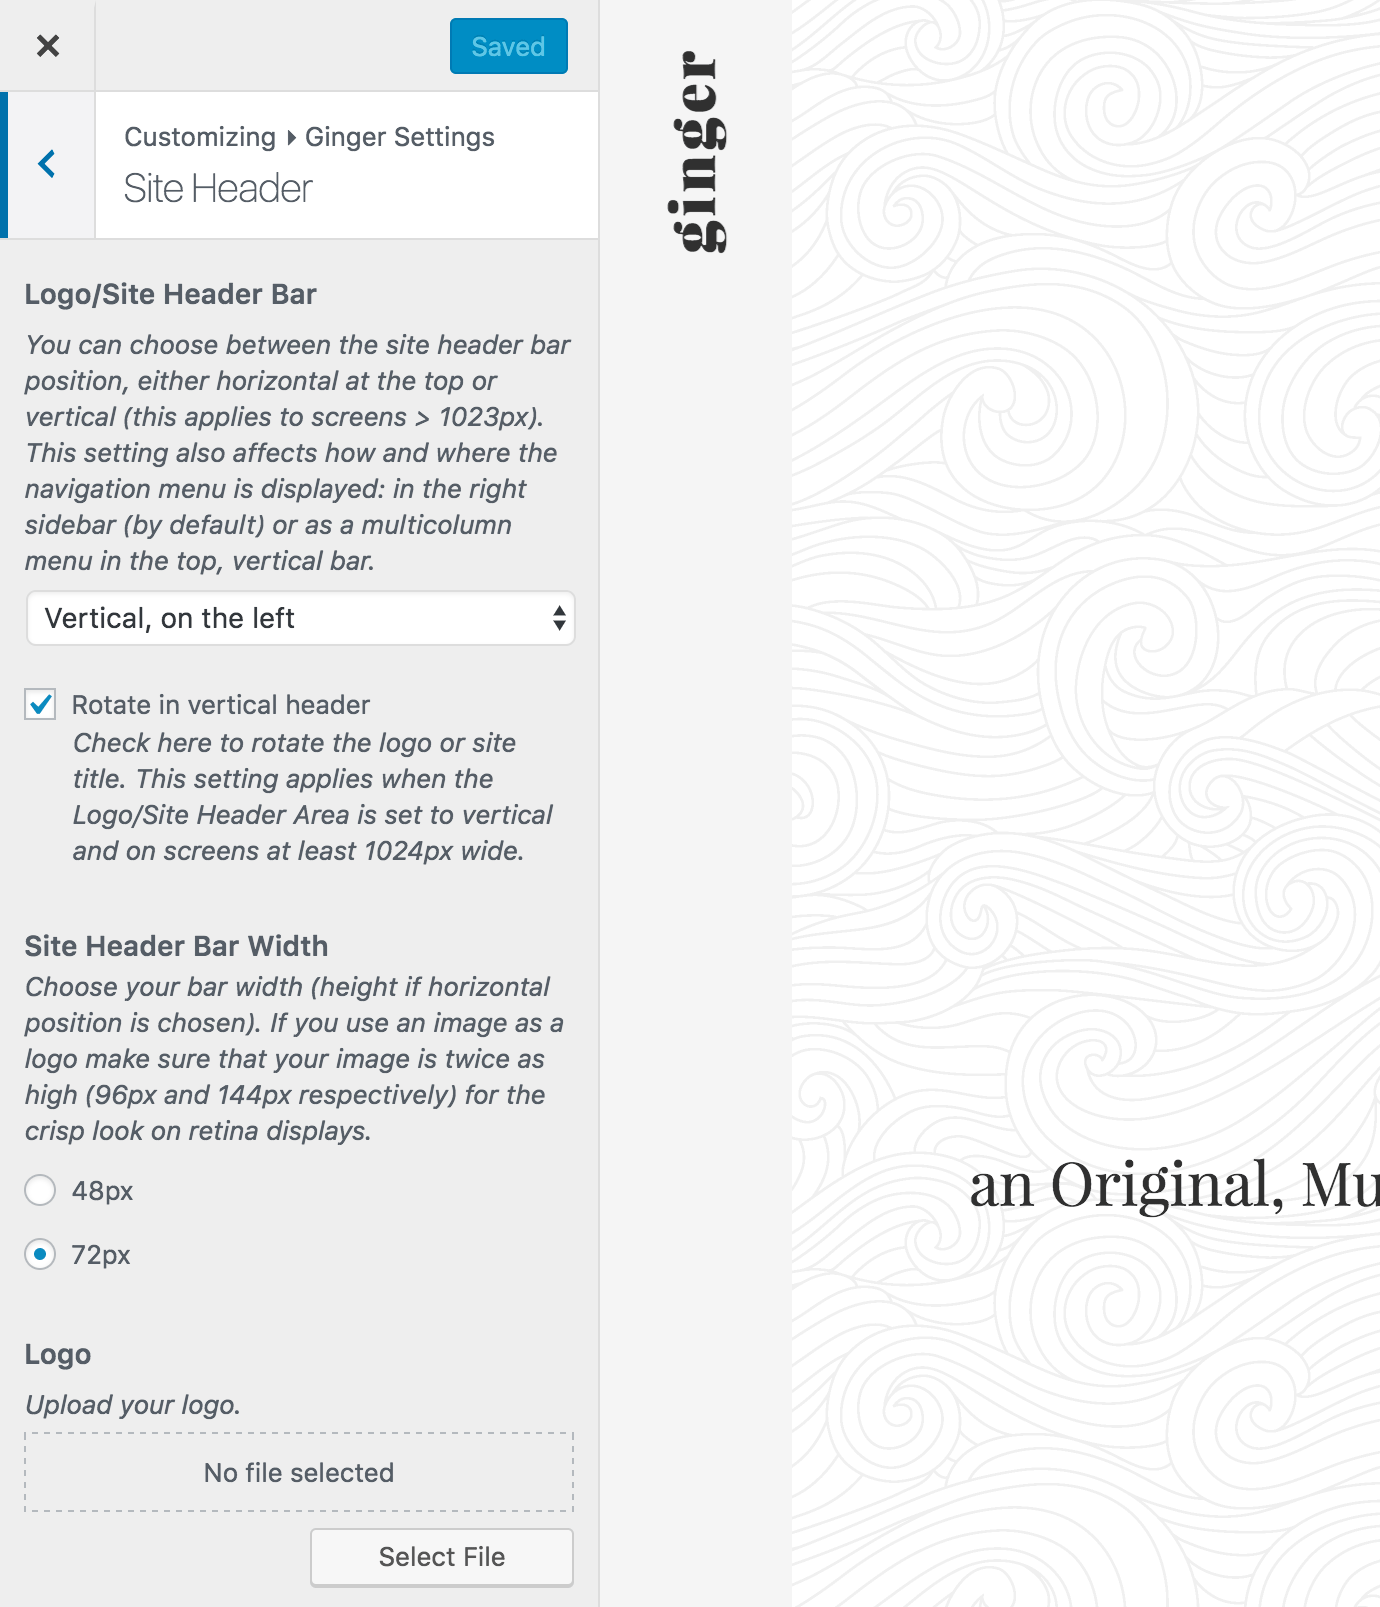
Here, You can choose between the site header bar position, either horizontal at the top or vertical (this applies to screens > 1023px). This setting also affects how and where the navigation menu is displayed: in the right sidebar (by default) or as a multicolumn menu in the top, vertical bar.
You can also decide to rotate the logo or site title. This setting applies when the Logo/Site Header Area is set to vertical and on screens at least 1024 px wide.
There are two bar width (or height if in horizontal position) options available . If you use an image as a logo make sure that your image is twice as high (96px and 144px respectively) for the crisp look on retina displays.
-
Social Links
In this panel you can add your social links - the available ones are: Behance, Blogger, Dribbble, Facebook, Flickr, Google-plus, Instagram, Linkedin, Pinterest, Twitter, Vimeo, and Youtube.
-
Dashboard Login
Some users like to personalize the logo displayed on the login page. You can upload a dashboard logo that will replace the default WordPress one.
The displayed logo height is 84 pixels. For a crispy look on retina screens prepare your image double sized – the width should not exceed 640px and the height should be 168px.
-
Fonts
With Ginger you can use two custom font families: one for the body text and one for the headings.
Simply choose a Google Font for body from Google Font Directory.
While choosing the body font family make sure that the italic, bold and bold italic styles exist, see the image below:
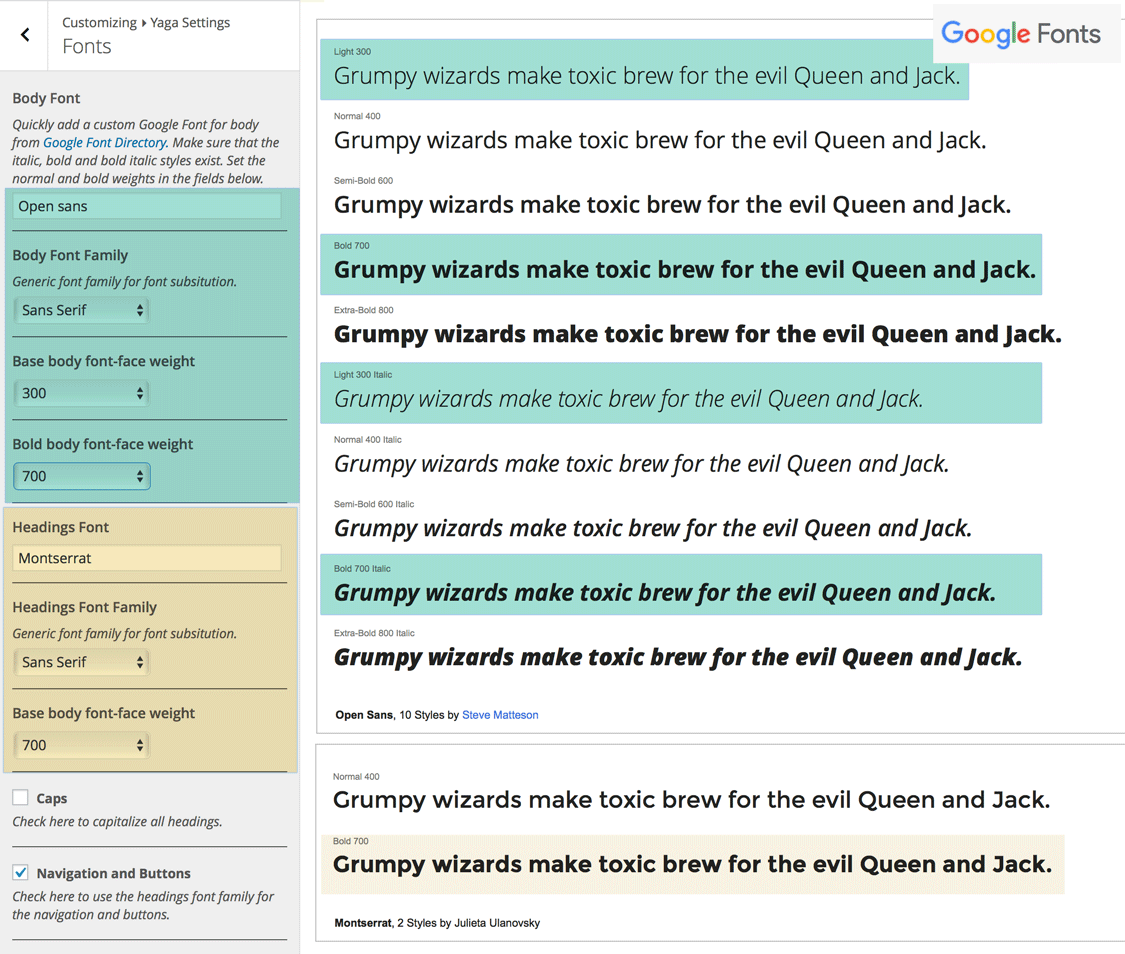
You can also decide to capitalize all the headings.
-
Colors
You can set custom colors for:
- body background and text
- your site "brand" color
- logo/site header bar background and text colors
- right sidebar background and text, and link on hover colors
- author bio background and text colors
- comments area background and text colors
Post/Page Metaboxes
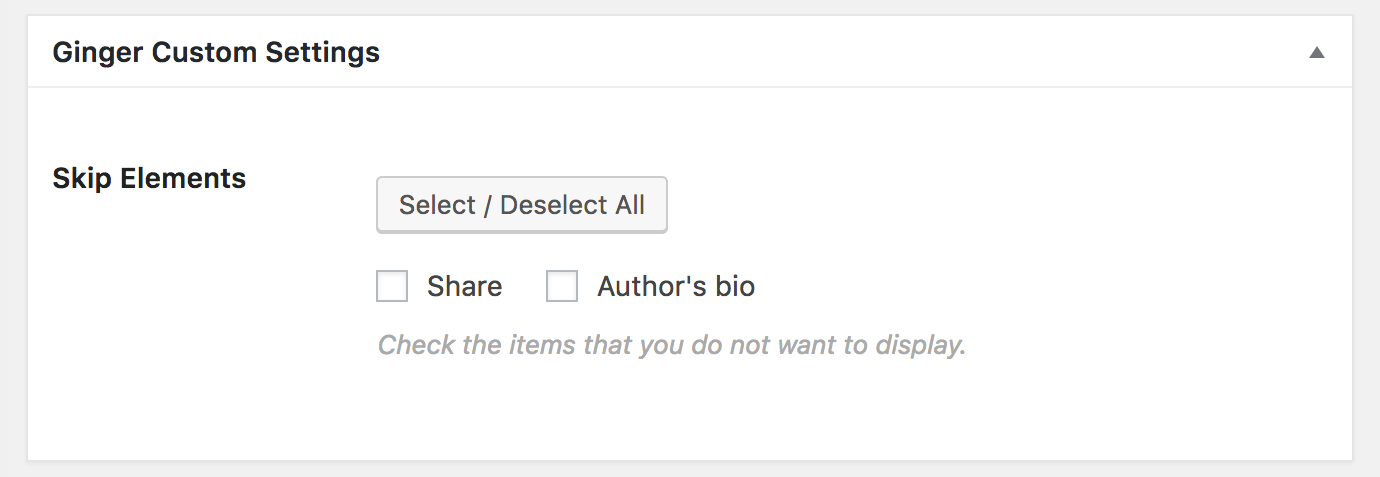
Once the CMB2 plugin is installed and activated all posts and custom post types display a custom metabox Ginger Custom Settings.
For posts you can decide to skip author’s bio or share links.
On custom post types you can also opt for skipping the automatically generated header pane (if page builder is activated) and the share links.
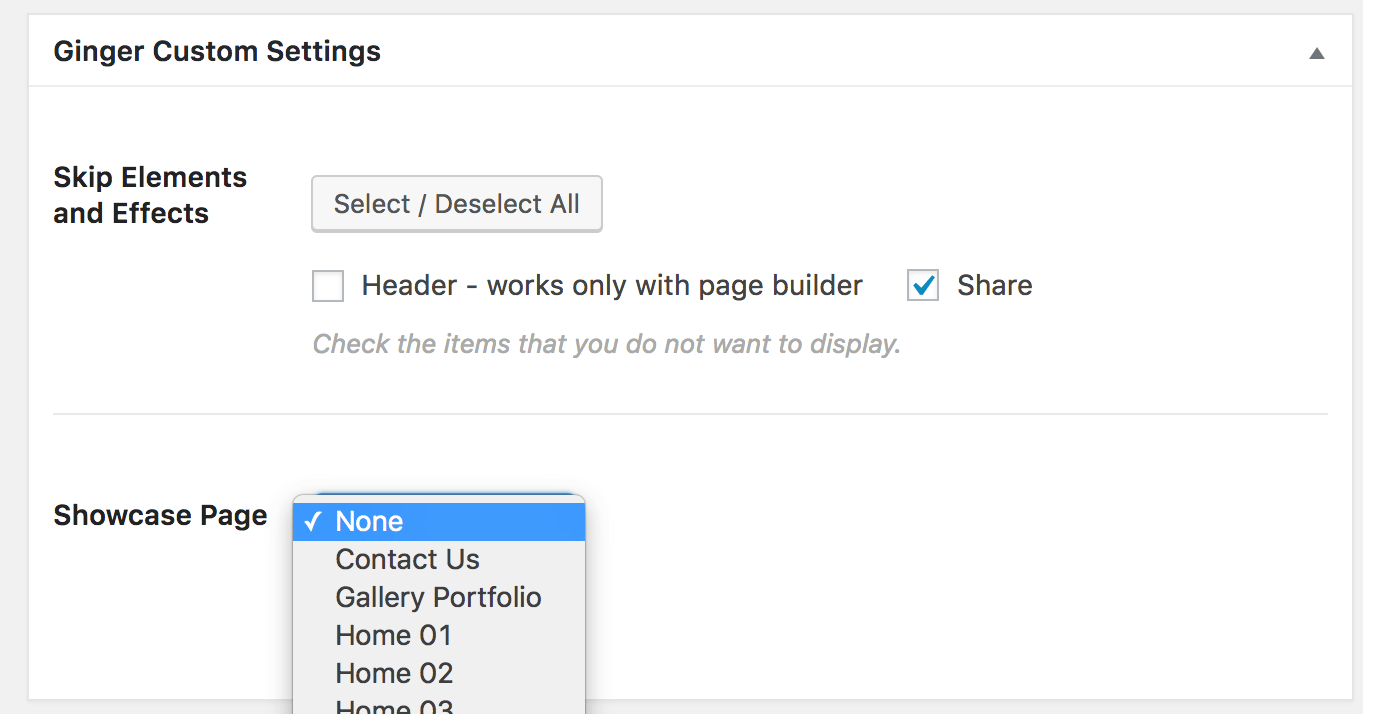
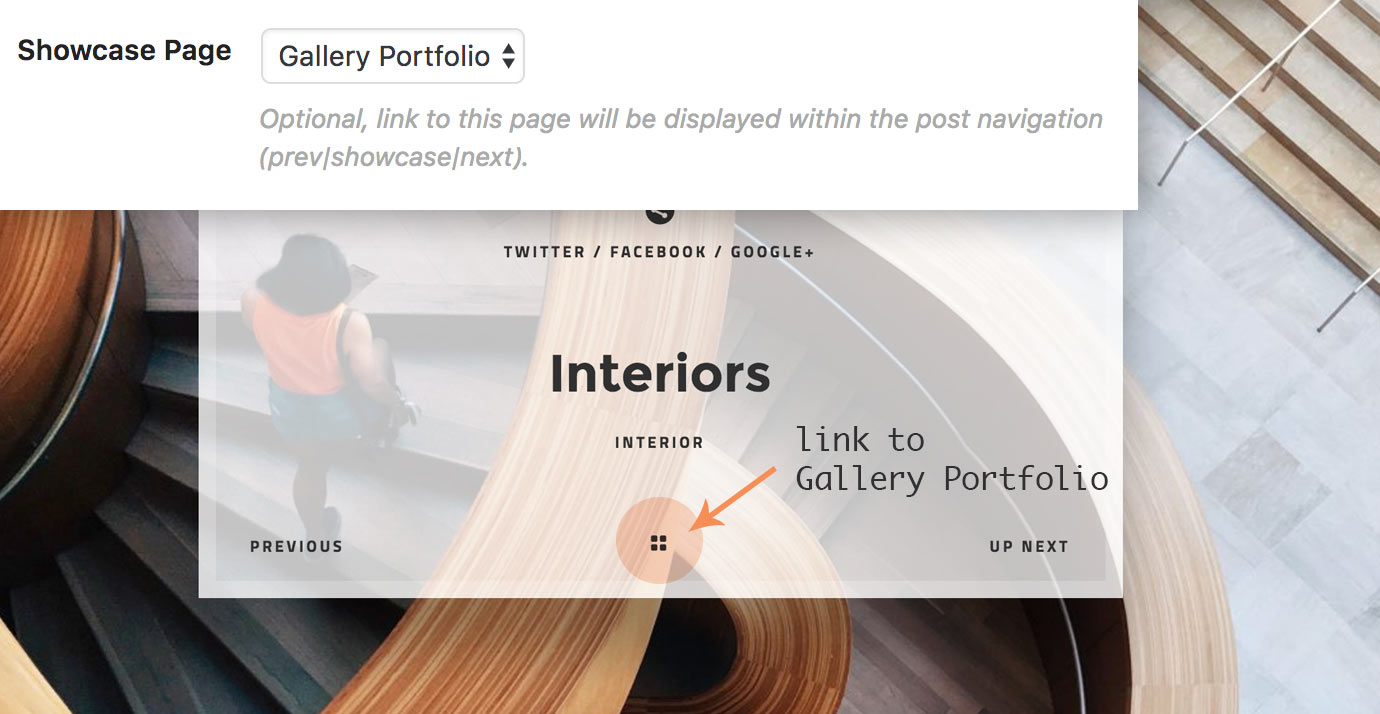
You can also set a link to the "showcase page" that will be displayed as a part of the post navigation.
Translate Your Theme
Ginger is translation-ready. You’ll find the ginger.pot file in the /languages folder.
You can use POEdit to translate your theme. Once downloaded and installed go to File > Open and choose the languages/ginger.pot file in your theme folder. Line by line translate the theme to your language. Go to File > Save as.. and save your files in the languages folder in your child-theme. Name your file accordingly to WordPress language codes, you may find them here. For example the language code for French is fr_FR so you would save your file as fr_FR.po. Note that the fr_FR.po file will be automatically compiled to fr_FR.mo file.
If your are not using a child-theme you should save your .po/.mo files in the 'wp-content/languages/themes' folder. It this folder does not exist - you'll have to create it. You'll also have to prefix the .po, .mo files with the textdomain string, "ginger-", for example the files for the french translation should be named ginger-fr_FR.mo and ginger-fr_FR.po
Make sure that WordPress knows which language you want to use. From WordPress 4.0 you don't need to edit the wp-config.php file to do that. Go to your Dashboard > Settings > Site Language choose your language and Save Changes.
Miscellaneous
Page Transitions
Ginger theme makes use of the barba.js library to enhance user experience by adding fluid transitions between pages, reducing the delay between your pages and minimizing browser HTTP requests.
This feature can be disabled in the Customization panel, see here.
Please note that the transitions are disabled for logged-in users, if you want to check this setting, go to your Dashboard > Users > your Profile and check Enable Transitions in the General Ginger Settings section.
You can also need to disable the transition for some particular pages. To do so, edit the functions.php file in your ginger-child folder:
add_filter( 'ginger_barba_disabled_links', 'custom_barba_disabled_links' );

function custom_barba_disabled_links( $array ) {
	/* disable transitions on pages with ids 33 and 105 */
	$array[] = get_permalink( 33 );
	$array[] = get_permalink( 105 );
	return $array;
}
You may also need to disable the transitions on some kind of links only, that is links with certain classes:
add_filter( 'ginger_barba_disabled_classes', 'custom_barba_disabled_classes' );

function custom_barba_disabled_classes( $array ) {
	$array[] = 'custom-class';
	$array[] = 'another-custom-class';
	return $array;
}
Troubleshooting
Sometimes things do not work as they should…
Header Video:
If the video doesn’t display, you might have to add the following in your .htaccess file (concerns Linux/Apache servers).
AddType video/mp4 .mp4
For more information see Mediaelementjs documentation.
Featured Images:
The images used on archive pages are automatically generated (resized) by WordPress during the image upload process. If your images are already uploaded please use the Regenerate Thumbnails plugin, that will generate the missing size for you.
You don’t need this plugin if you start building your site with Ginger and you’ll upload all your images with Ginger being activated.
Theme styles not loading properly:
Ginger theme minifies the css and javascripts files. If you use a service like Cloudflare, it may happen that the double minification of the css files causes problems. It's recommended that you only have one minify option turned on for your website.
In this case you should either turn off the css minification via your optimizationn service or enqueue the unminified css file.
To enqueue the unminified css file use a child theme and add the following block of code to ginger-child/functions.php:
add_filter( 'pehaathemes_main_stylesheet', 'not_minified_pehaathemes_main_stylesheet', 11 );
function not_minified_pehaathemes_main_stylesheet() {
	return 'style.dev';
}
Google Maps
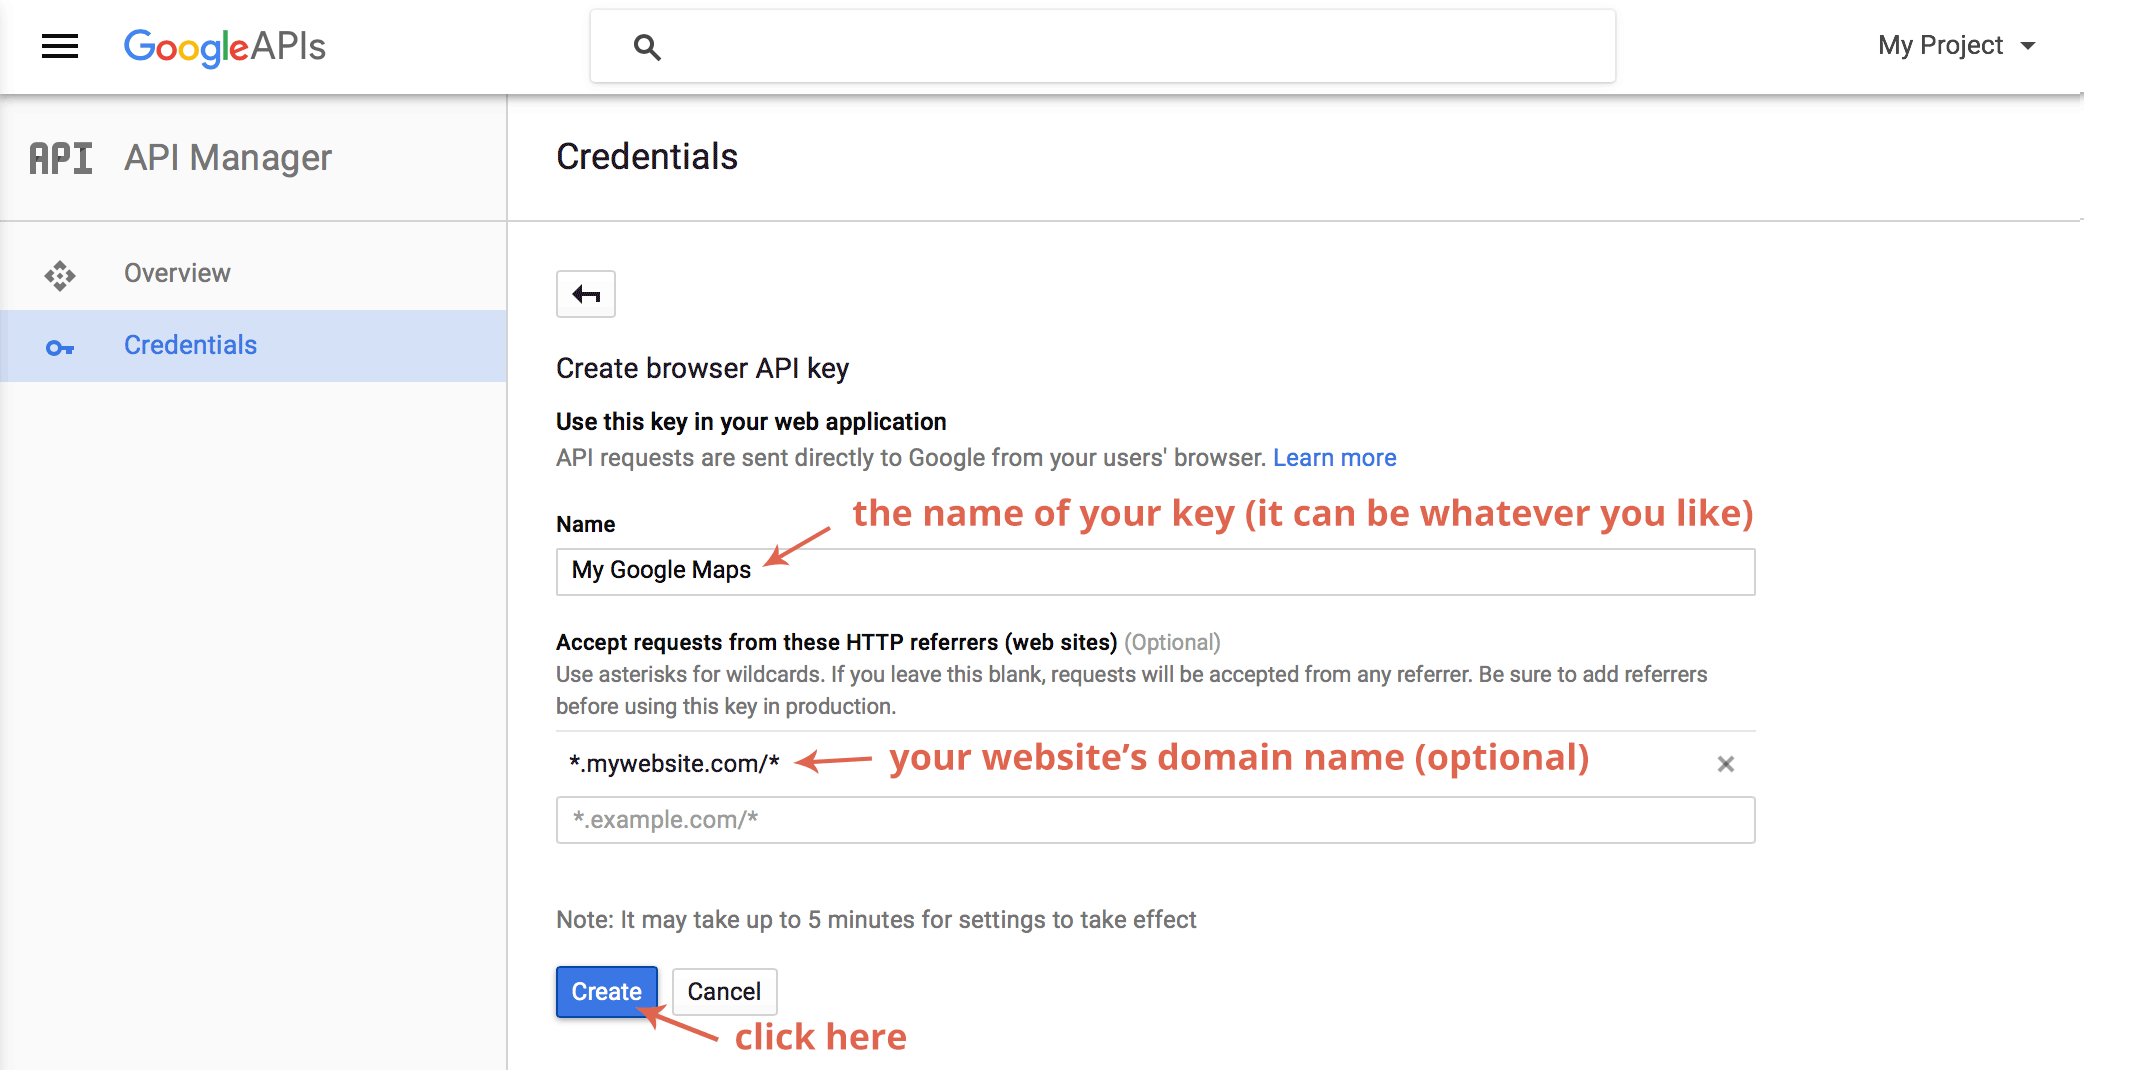
If you want to add a Google Maps you’ll have to create your Google Maps API key to display your google map. To obtain the API key you will have to login to the Google Developers Console (follow this link) (you’ll need to have/create a Google account). You’ll be guided through the process.
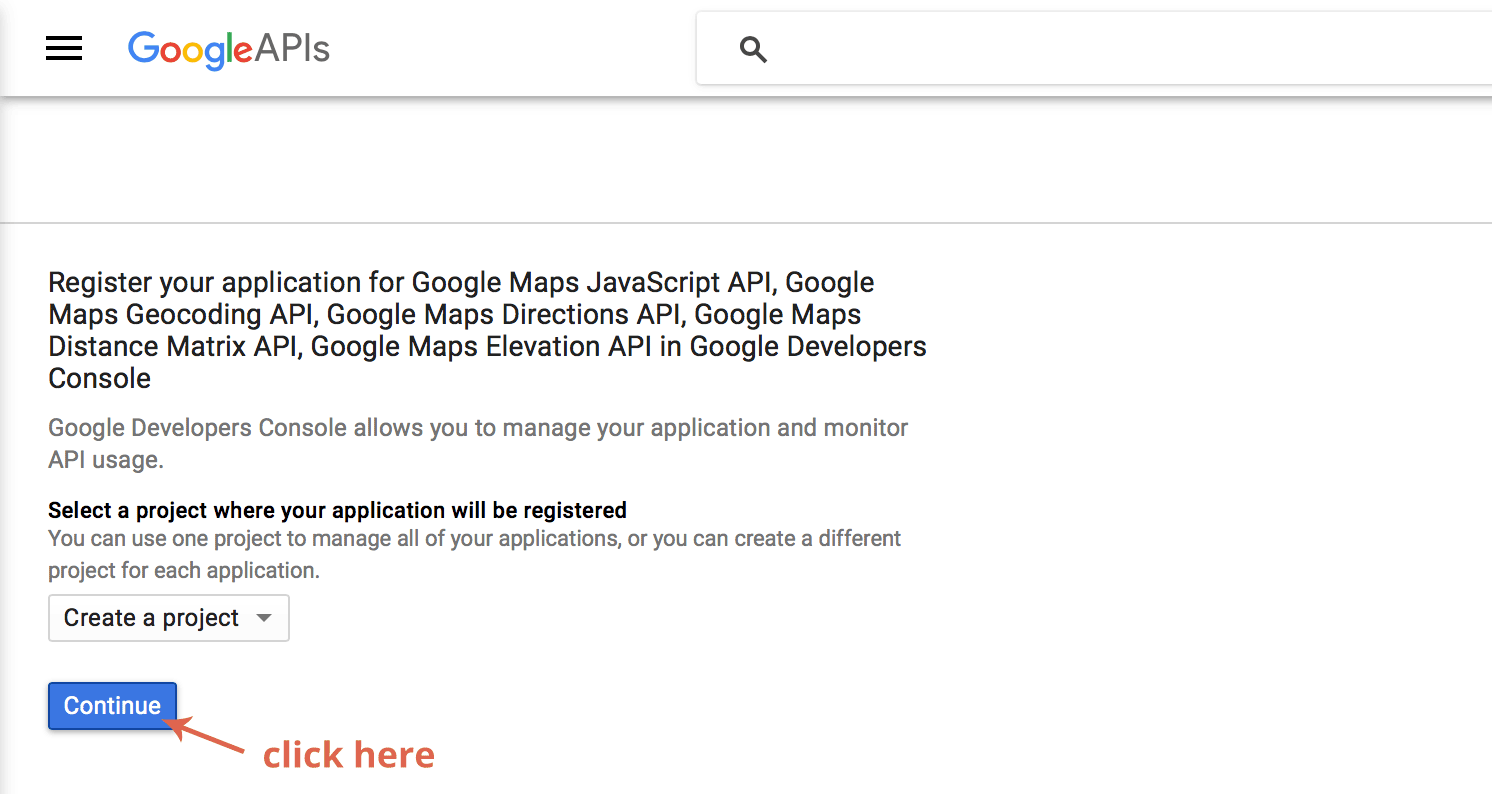
All you need to provide is some key name (you can set whatever you like, for example My Google Maps) and (optionally) you can input your website’s domain name (add an * in front of it to allow access from both www.domain.com and domain.com).
Click “Create”.
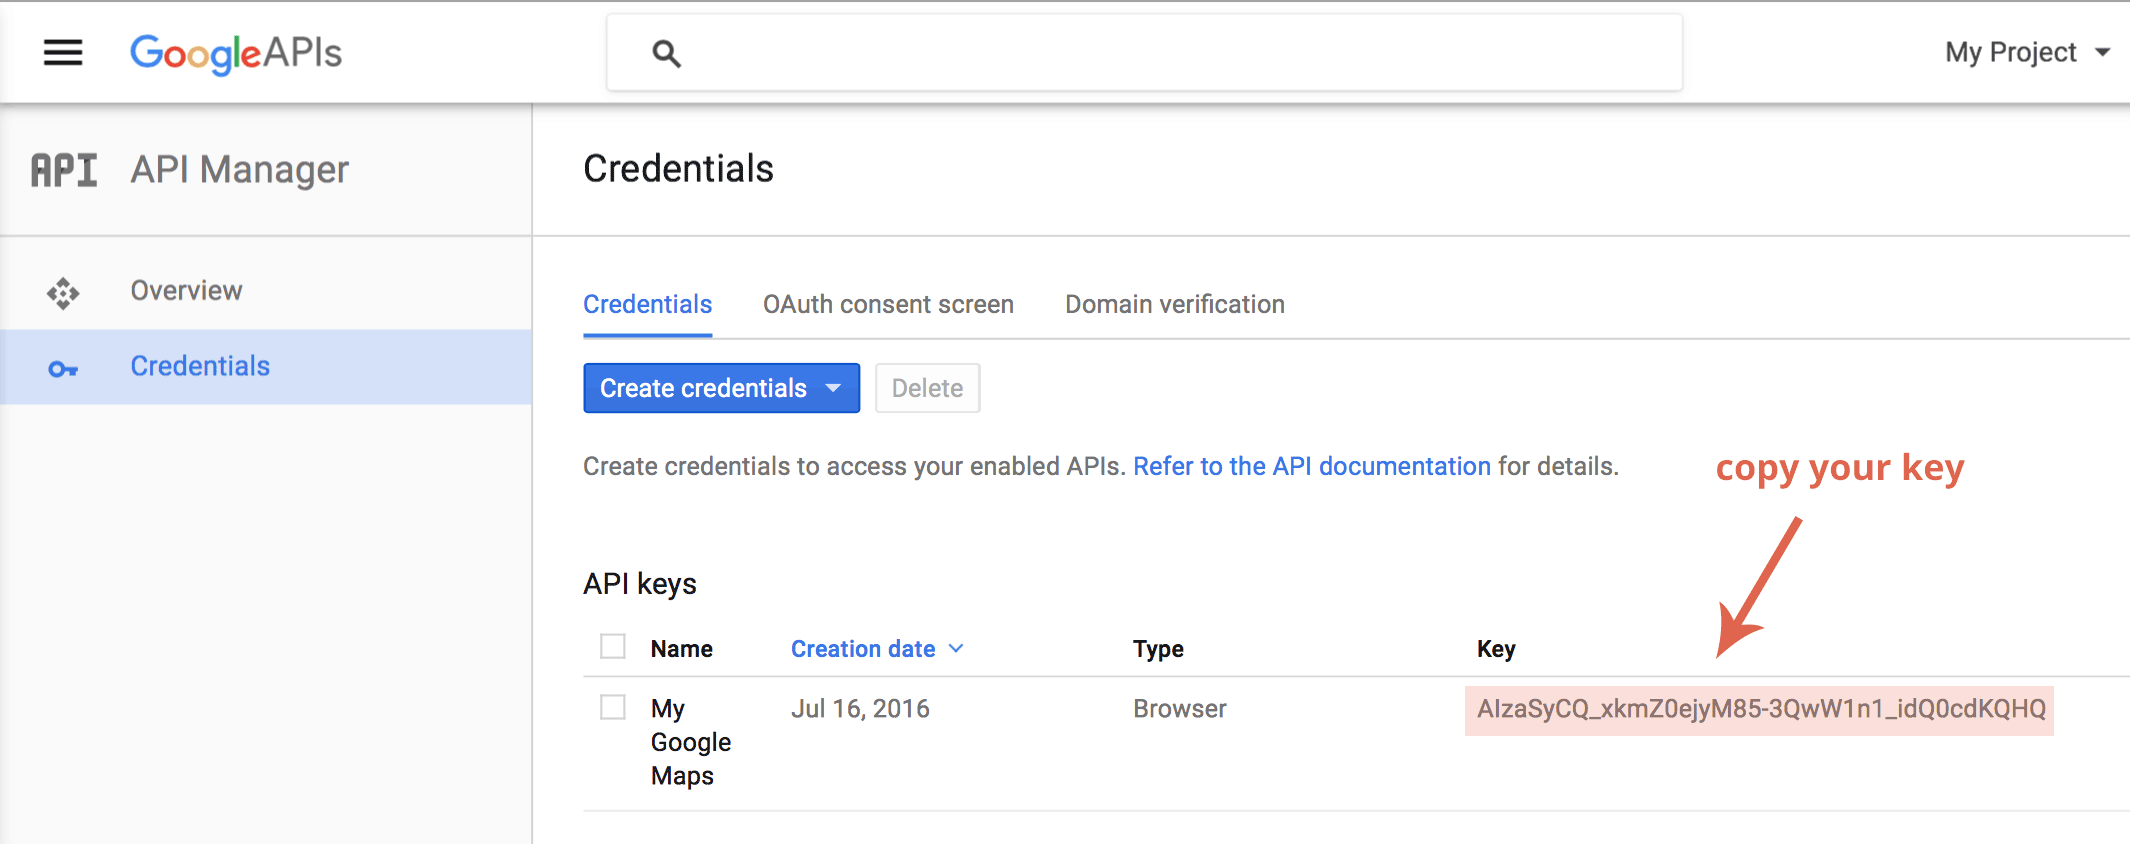
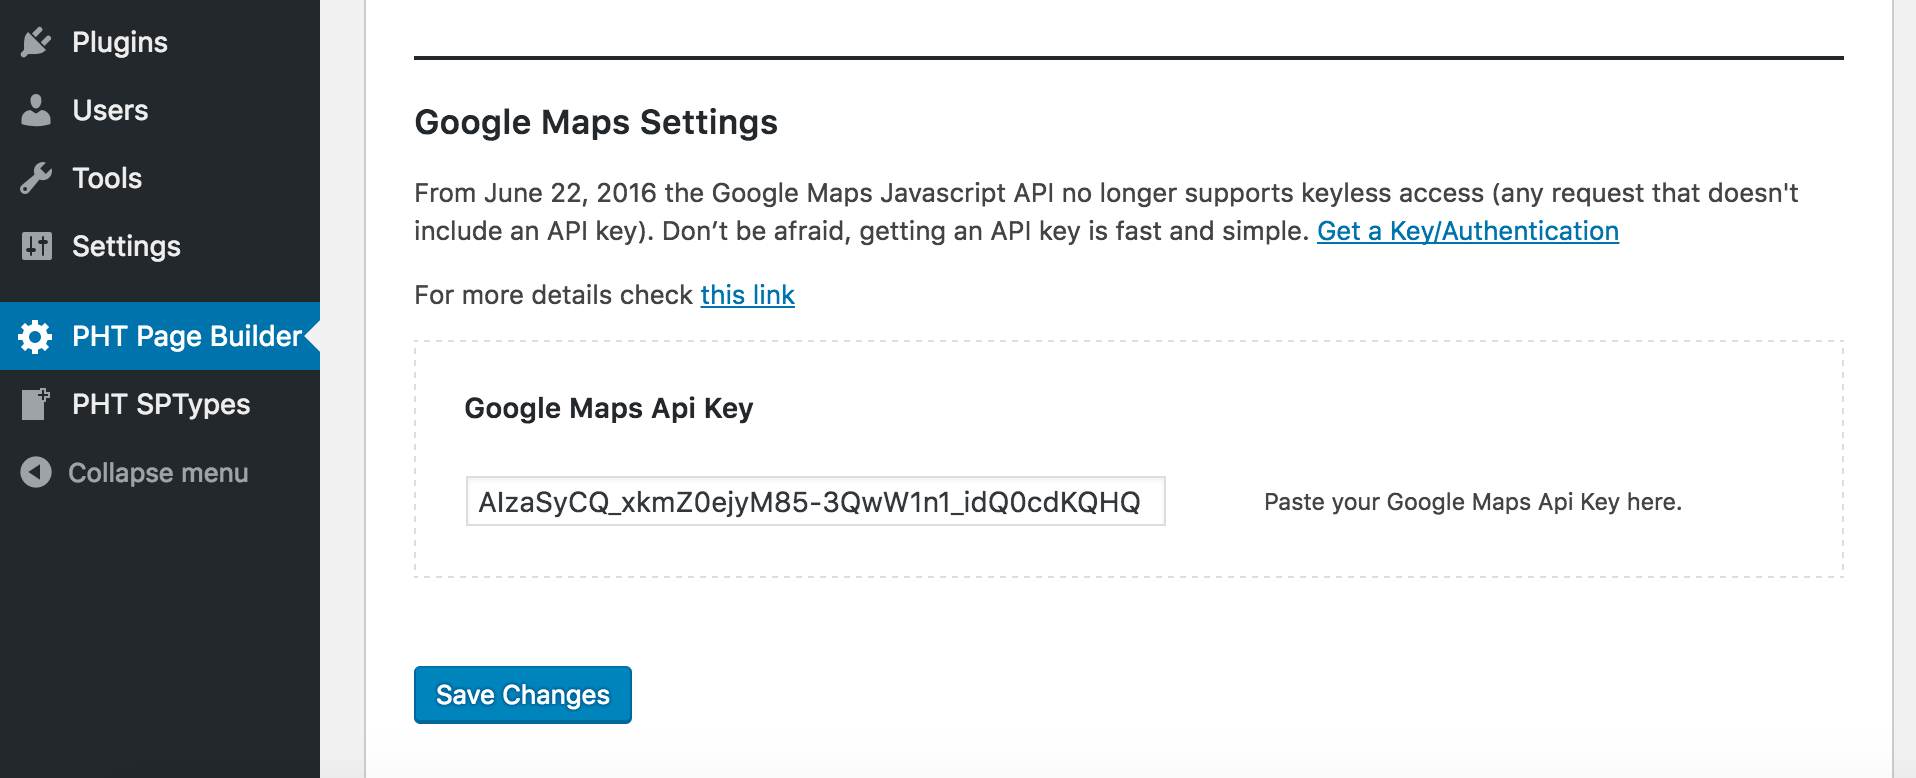
Copy your API key and paste into the field in the PHT Page Builder settings. Save Changes. Please note that it can take a few minutes for settings to take effect.
Helper Css Classes
Since you can add custom class attributes to your page builder modules we provide a few helper classes:
Text alignment
If you want to align text within your module/column/section:
- pht-text-center
- pht-text-left
- pht-text-right
Margins
To force the bottom/top margins of your module/column:
- pht-mb – will force a 24px bottom margin
- pht-mb0 – will force a 0px bottom margin
- pht-mt – will force a 24px top margin
- pht-ml – will force a 24px left margin
- pht-mr – will force a 24px right margin
Letter Spacing
pht-spacedletters will increase the spacing between letters
Color
- pht-color - will apply the "brand" color to the text of an element
- pht-white - will apply the white color to the text of an element
- pht-bgcolor – will apply the "brand" color to the background
- pht-bgcolor--desk - will apply the "brand" color to the background on screens that are at least 1024px wide
Thank you. Please don't hesitate to contact us via our themeforest profile page.