Panes WP Theme Documentation
- Getting Started
- Installation
- Setup
- Customization
- Child Theme
- Theme Options
- Building Your Site
- First - Home Pane
- Showcase
- Recent Post
- Contact
- Navigation
- Shortcodes
- Miscellaneous
- Translate Your Theme
- Troubleshooting
- Docs for Panes 2.0
Getting Started
Thank you for choosing Panes - we truly appreciate that! Before you start setting up your website, please read through this documentation.
Important! If you are updating the theme from version below 3.0 you'll have to run the theme setup.
Installation
Panes theme (starting from version 3.0) does not support WordPress version earlier than 4.0 so make sure you've got the current version of WordPress. In order to download the current version, please visit wordpress.org. Please check WordPress Codex for information on how to install WordPress on your server.
Once WordPress is successfully installed, you will have to upload the theme to your WordPress directory. We highly recommend activating the Panes's child theme instead of Panes itself. That means you will have to install two themes: panes and panes-child. Both are included in the panes-package folder.
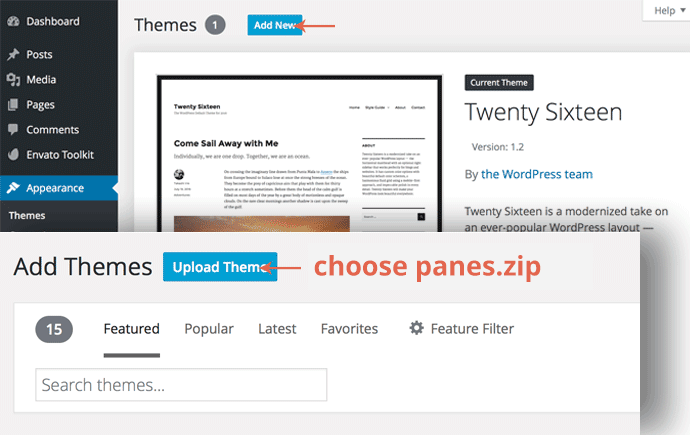
Download and unzip the panes-package folder. You'll find two zipped theme folders panes.zip and panes-child.zip.
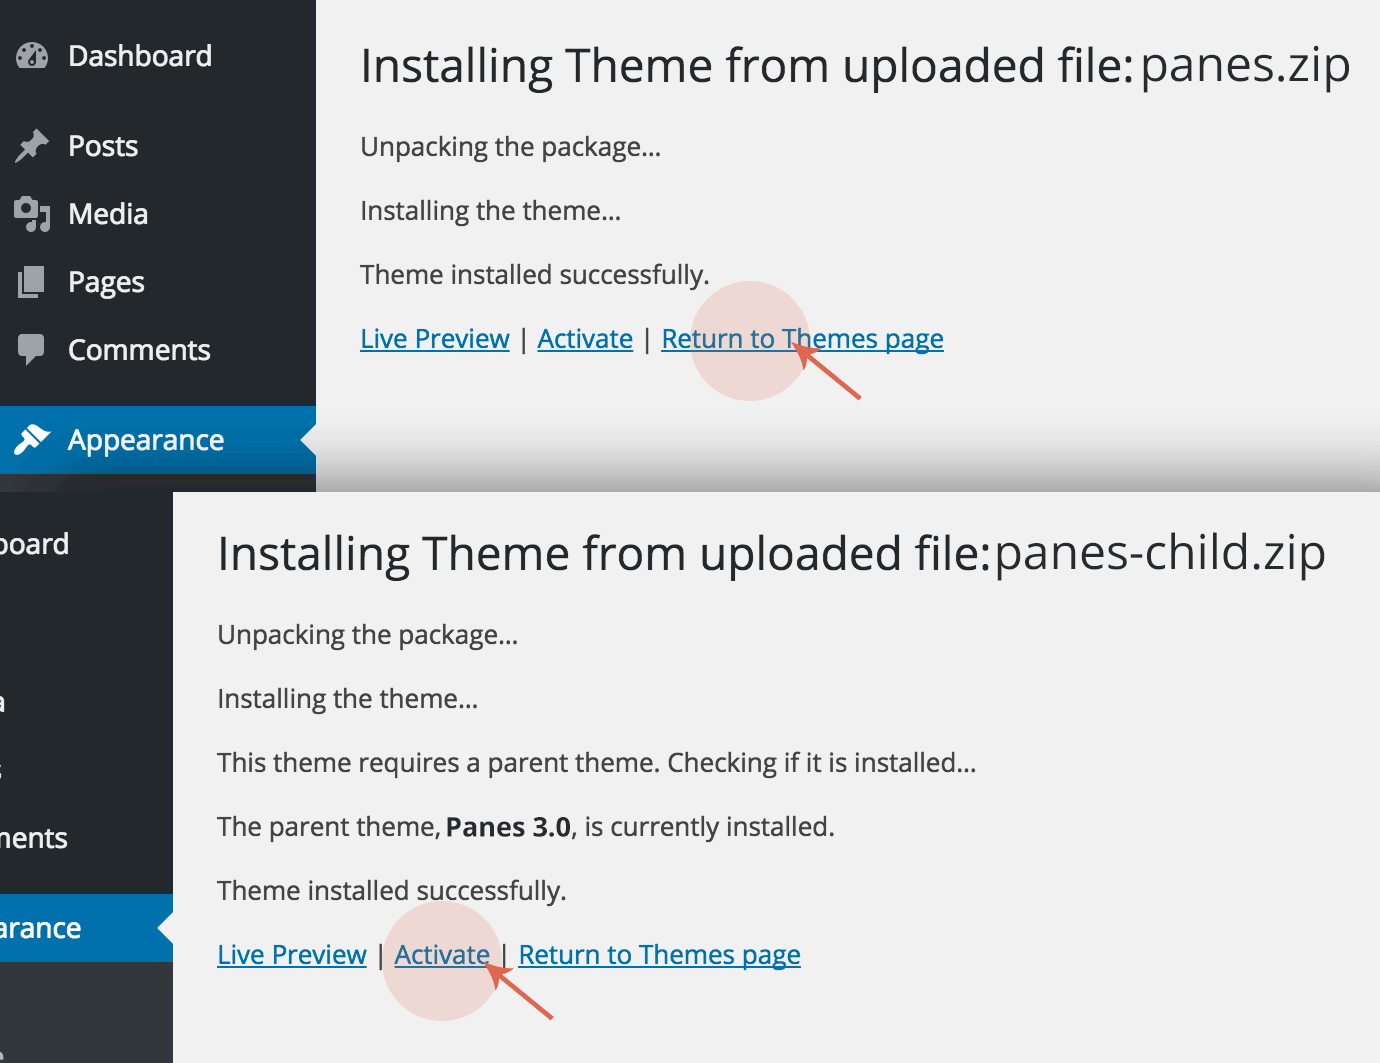
Open your WordPress dashboard. Go to Appearance > Themes. Click the Add New Theme button, then Upload Theme and select the panes.zip file. Click Install Now.
Don’t activate the theme yet. Repeat the upload/install process for with the panes-child.zip file and activate the panes-child theme once installed.
Setup
Once activated Panes will display a Welcome Screen sending you to the Panes Setup page (you can also access it in Appearance > Panes Setup).
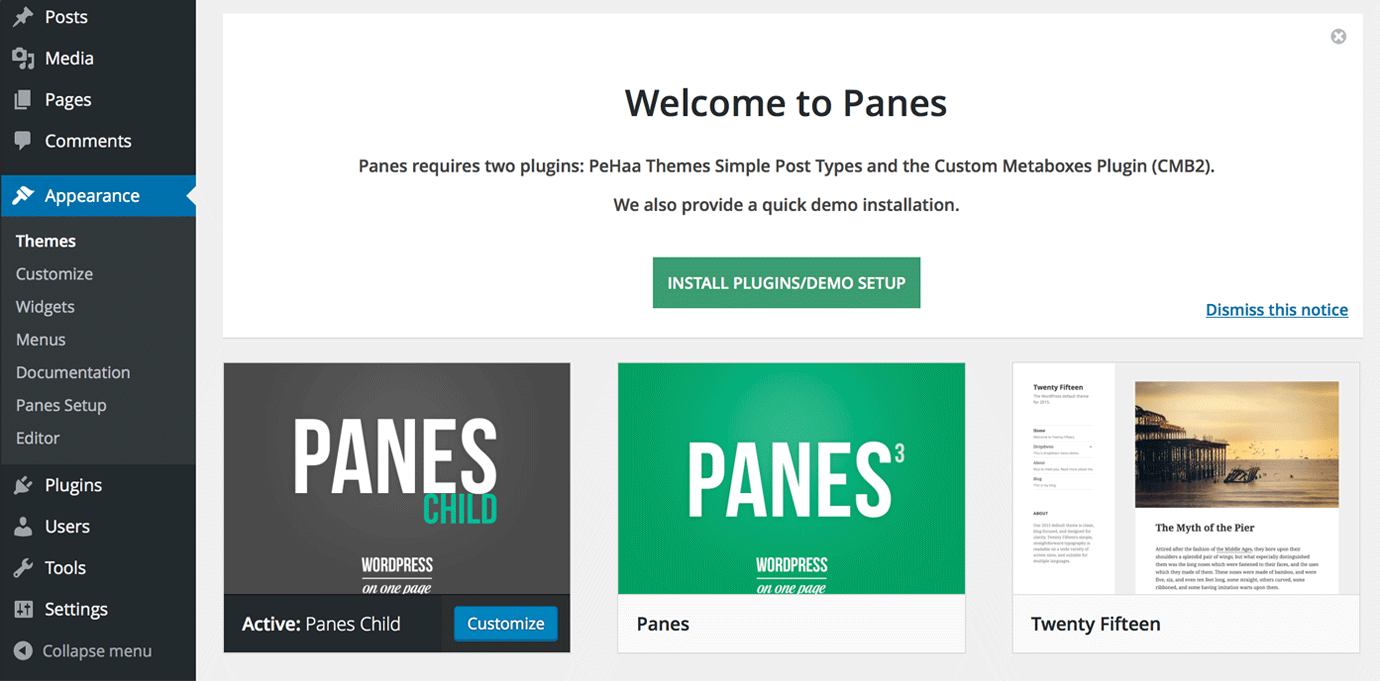
You can choose between simple installing, activating and configuring the required plugins or you can also import the demo data.
Important! If you are updating the theme from version below 3.0 you'll have to run "Install, Activate and Configure Plugins".
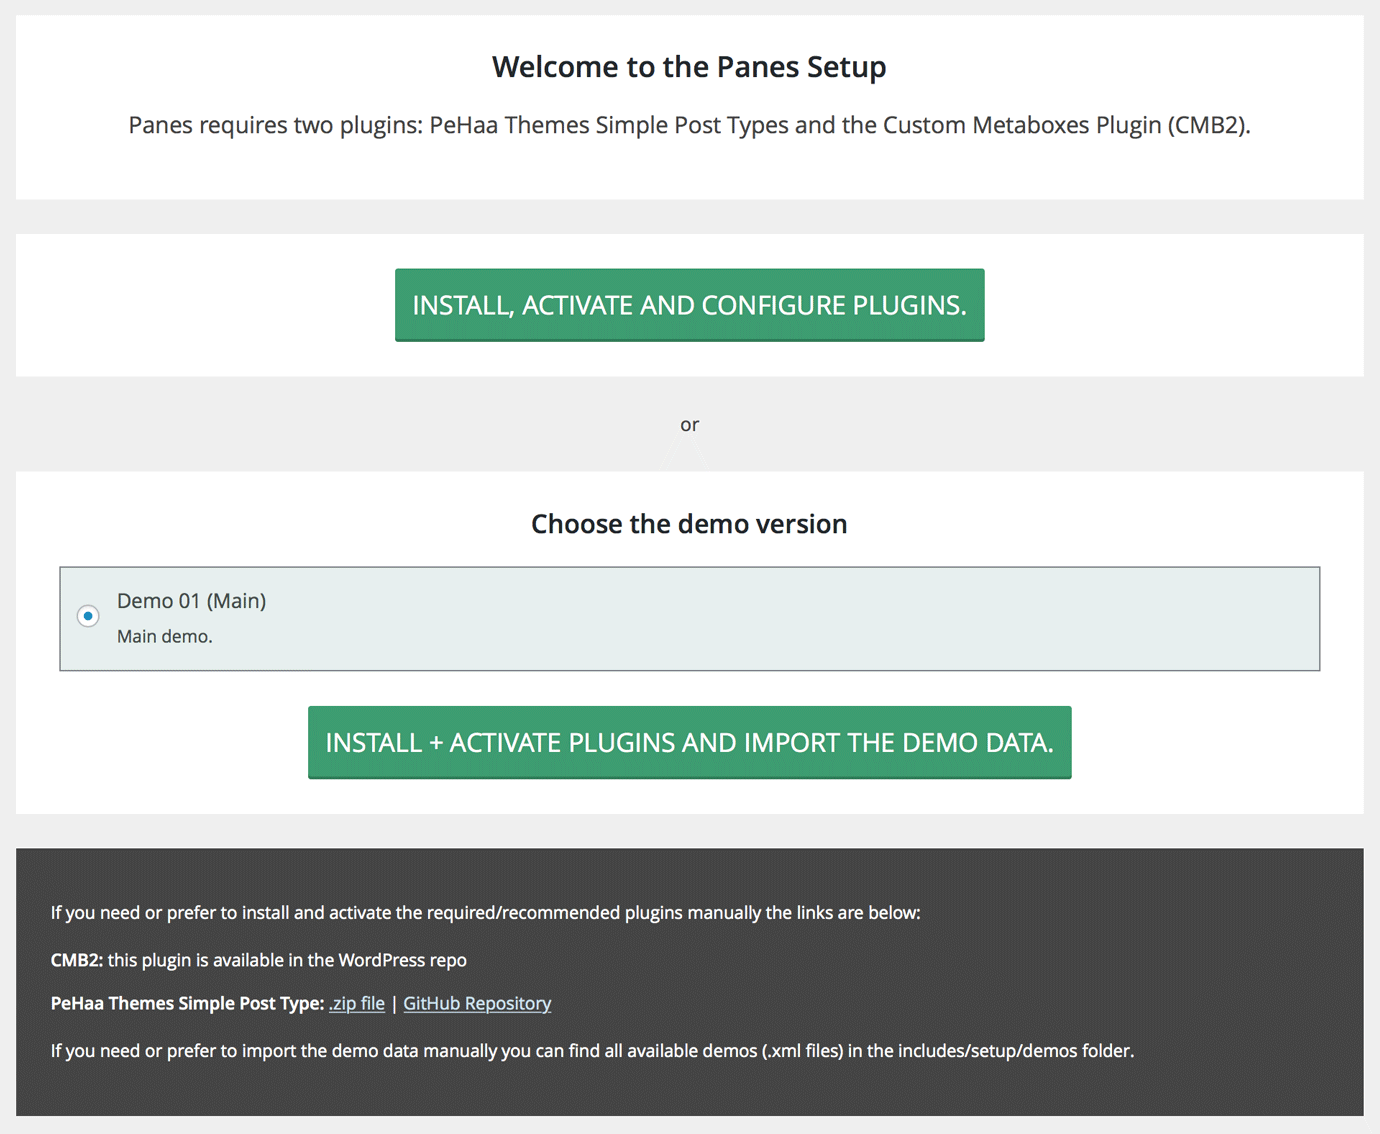
In both cases the following plugins will be installed and activated:
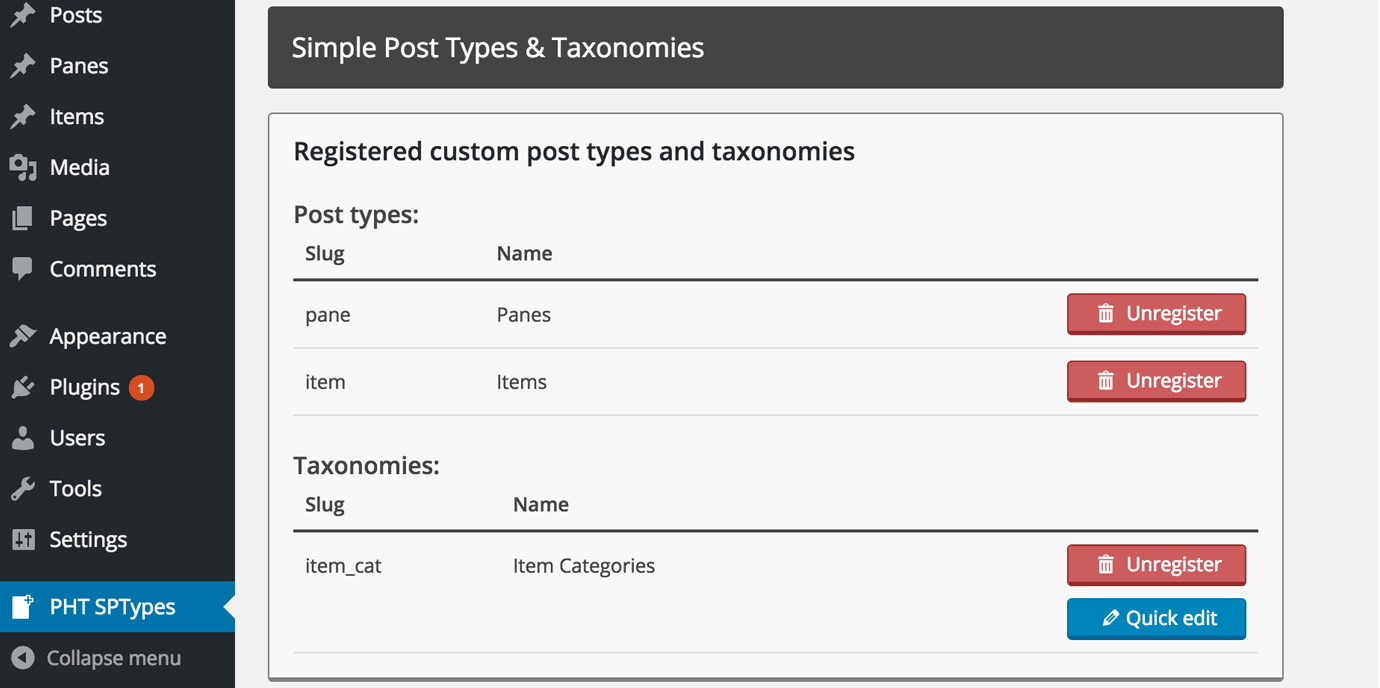
- PeHaa Themes Simple Post Types
- CMB2 (Custom Metaboxes and Fields by WebDevStudios)
PeHaa Themes Simple Post Types is a simple plugin by PeHaa Themes that allows you add easily custom post types and custom taxonomies.
Within the Panes configuration two custom post types will be registered: Panes that allows you to build your home page and Items that you can use to create a portfolio.
You will need CMB2 - Custom Metaboxes and Fields to manage some additional settings for your posts and pages. See the Post/Page Metaboxes section.
The demo data is imported from wptemplates.pehaa.com/wp1/
Please note that for the copyright reasons the images loaded with the demo data are blurred.
We do not include Contact Form 7 (available in WordPress repository) but we recommend using it to create the contact form.
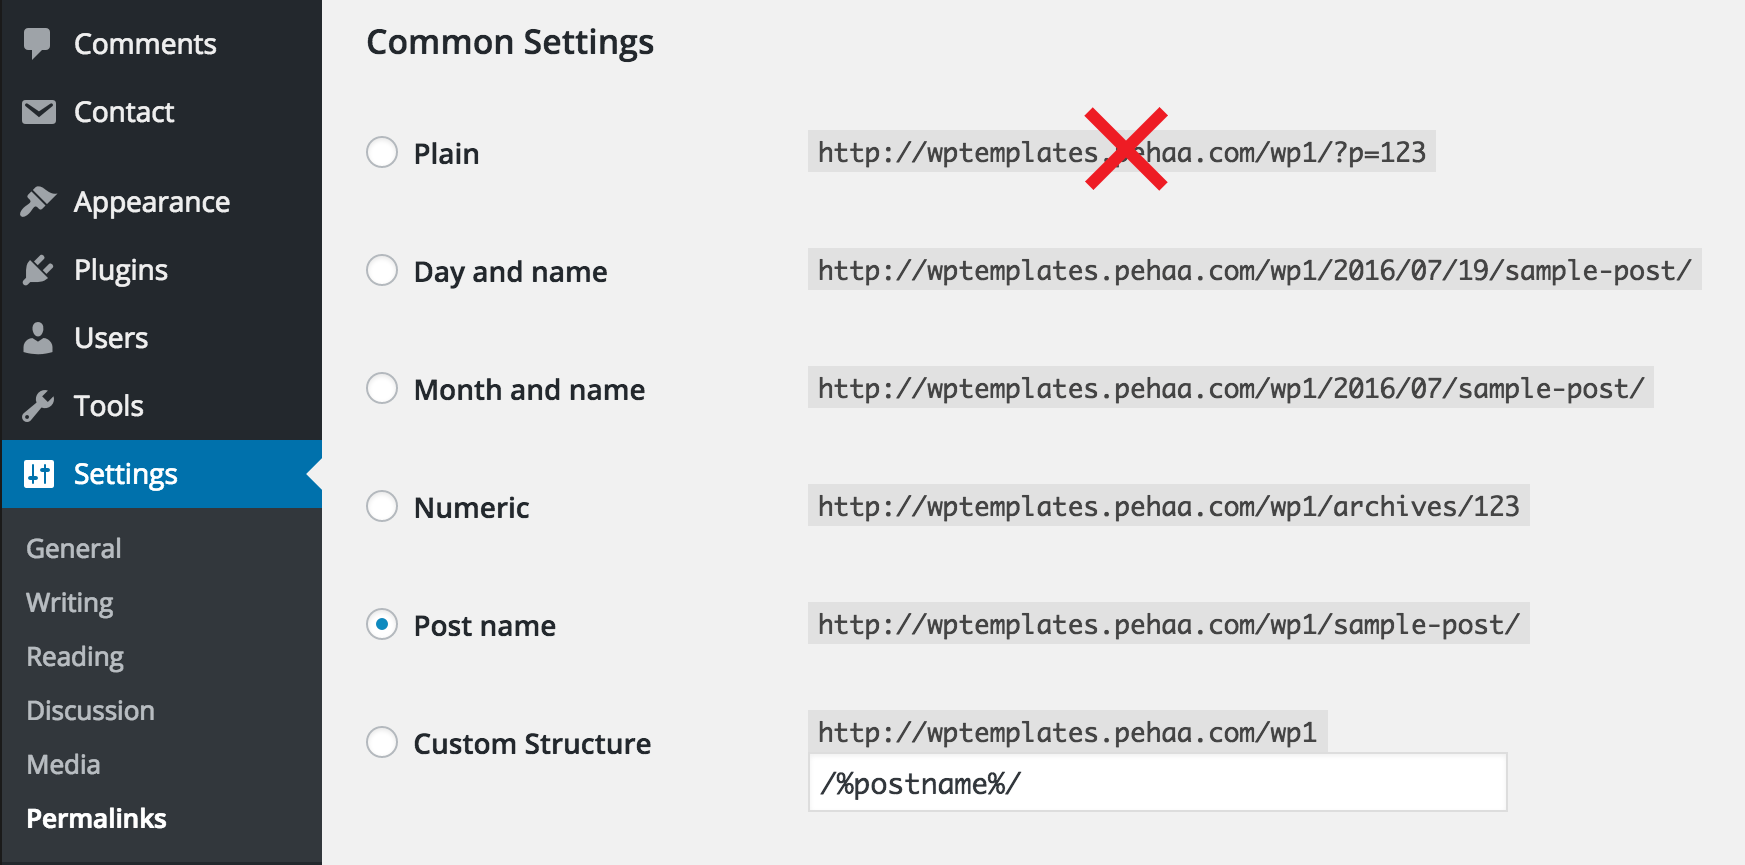
Important step! Please go to Settings > Permalinks and change the Default to Post name. The ajax loading will not work if the Permalink structure is set to Default. Check Setting Permalinks section in WordPress Codex if you encounter any problems.
Customization
Child Theme
Unless you are absolutely sure that you will never ever need to modify any of the theme files you should install and activate a child theme for Panes.
For your convenience Panes comes with a ready to use child theme. You’ll find the "panes-child" folder in the panes-package folder as well as an install-ready panes-child.zip file. Its files structure is as in the image below.
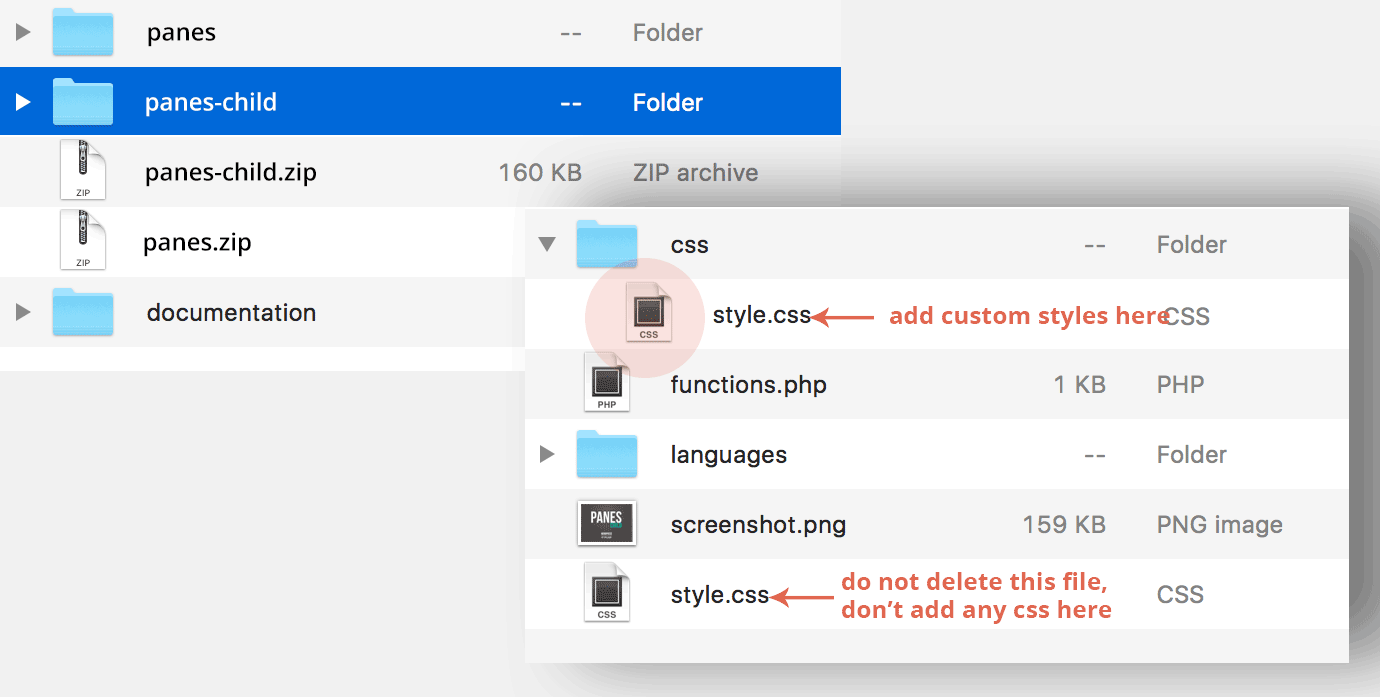
If you want to modify the theme css, you’ll have to edit the css/style.css file. It contains the three lines of code as below. Please note that you should not use “@import”, the parent css is loaded before your custom child css so “@import” is no needed.
/* Theme customization starts here. */
/* DO NOT use "@import". Just type some css that you need to add or override. */
/* Good luck with your project! */
If you are translating your theme (see Translate Your Theme section) you should add your translation files into the languages folder in your child-theme.
Theme Options
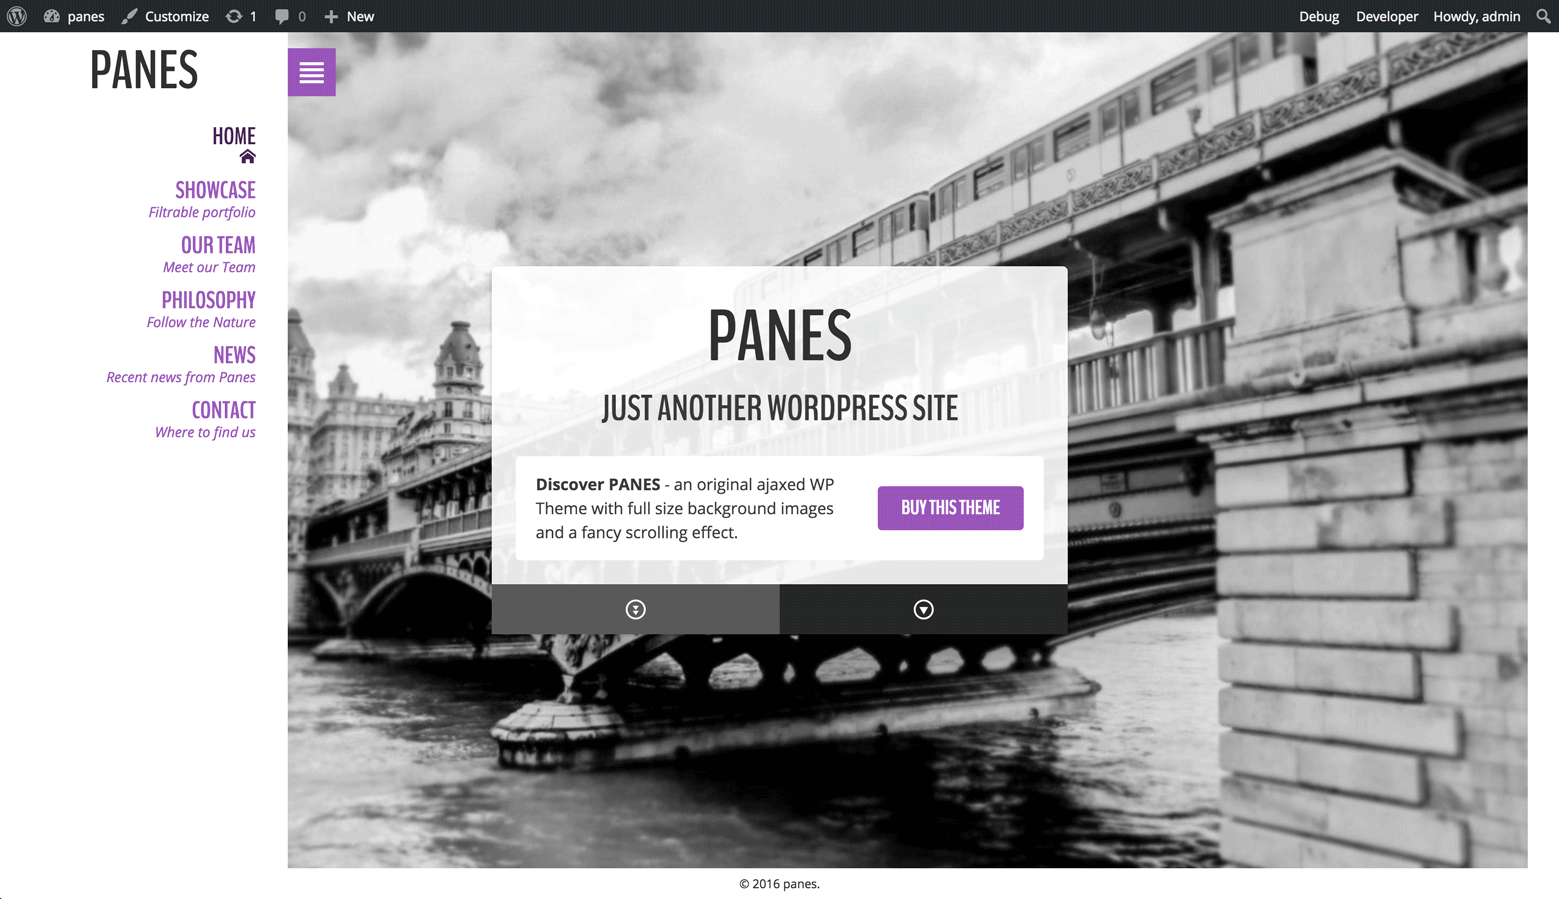
Starting with Panes 3.0 all the panes theme customization happens through the WordPress customizer. That means the front-end view and your changes instantly visible – a big advantage from the user perspective.
Important!
All your customization is theme specific and your settings will not be applied if you switch between a child and the parent theme.
-
Logo
You can upload your logo, both in standard and retina resolution. If you don't upload your logo, your Site Title will be displayed instead. You can disable/enable site tagline.
-
Navigation
- Disable inter-panes scrolling - if you want to disable the scrolling when navigation from one pane to another.
- Enable Secondary Navigation - if you want to display an additional navigation menu in the top bar.
- Hide Left Sidebar - if you want the left (navigation) sidebar to be hidden on page load, only icon left visible.
- Keep Navigation Sidebar Opened - if you want the left sidebar to stay opened - this feature will only work on large screens.
-
Custom Scripts and Footer
If you use some traffic tracking script, it’s where you can paste your code. You can choose whether to add your custom script to the page head or to the footer.
-
Dashboard Login
Some users like to personalize the logo displayed on the login page. You can upload a dashboard logo that will replace the default WordPress one.
The displayed logo height is 84 pixels. For a crispy look on retina screens prepare your image double sized – the width should not exceed 640px and the height should be 168px.
-
Contact
Use this tab to set your all your contact data (address, phone, fax, e-mail).
We leave the possibility to activate the built-in contact form only for legacy reasons. We recommend using the Contact Form 7 WordPress Plugin instead - it's available in WordPress repository.If you want to add a Google Maps you'll have to create your Google Maps API key to display your google map. To obtain the API key you will have to login to the Google Developers Console (follow this link) (you'll need to have/create a Google account). You'll be guided through the process.
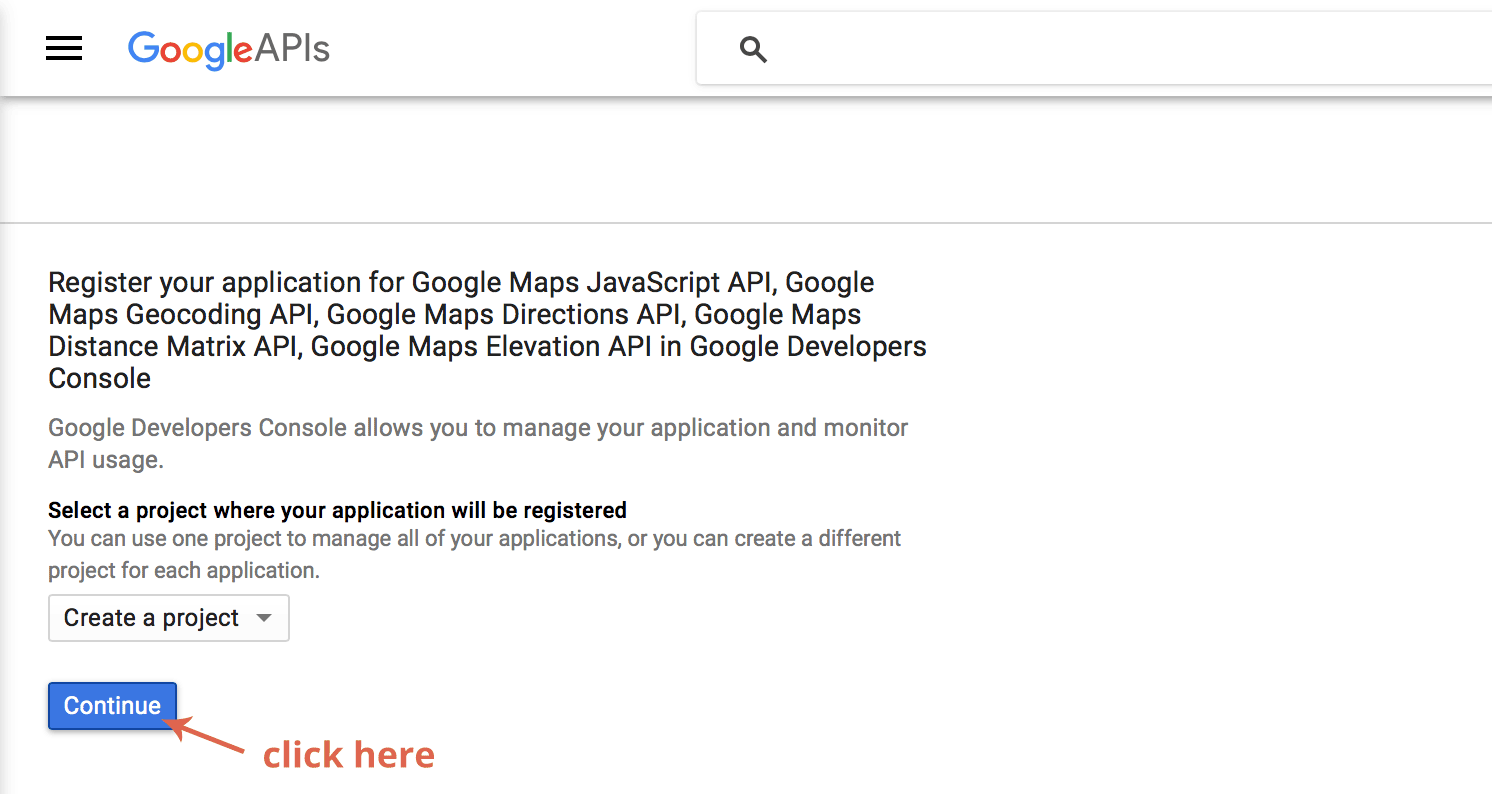
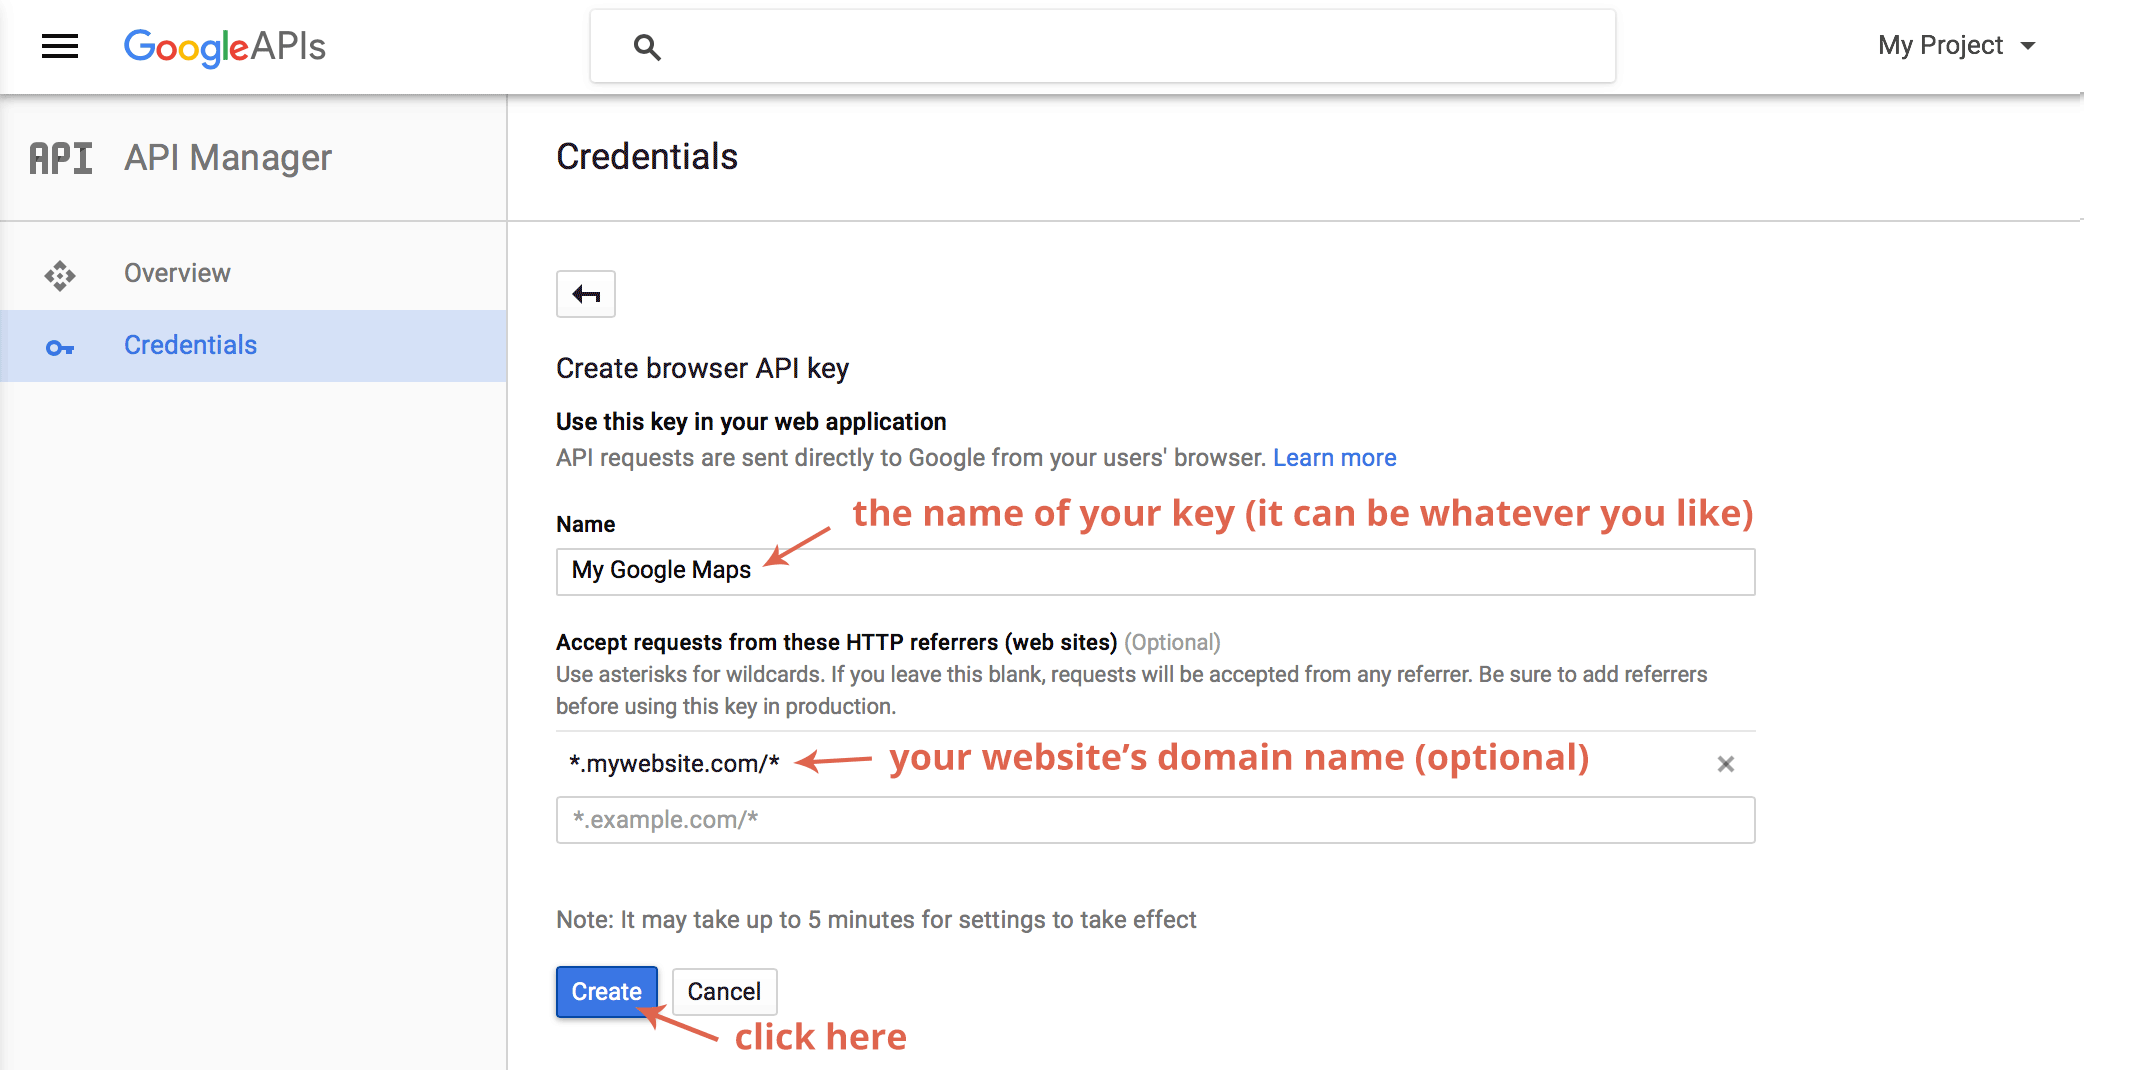
All you need to provide is some key name (you can set whatever you like, for example My Google Maps) and (optionally) you can input your website's domain name (add an * in front of it to allow access from both www.domain.com and domain.com). Click create.
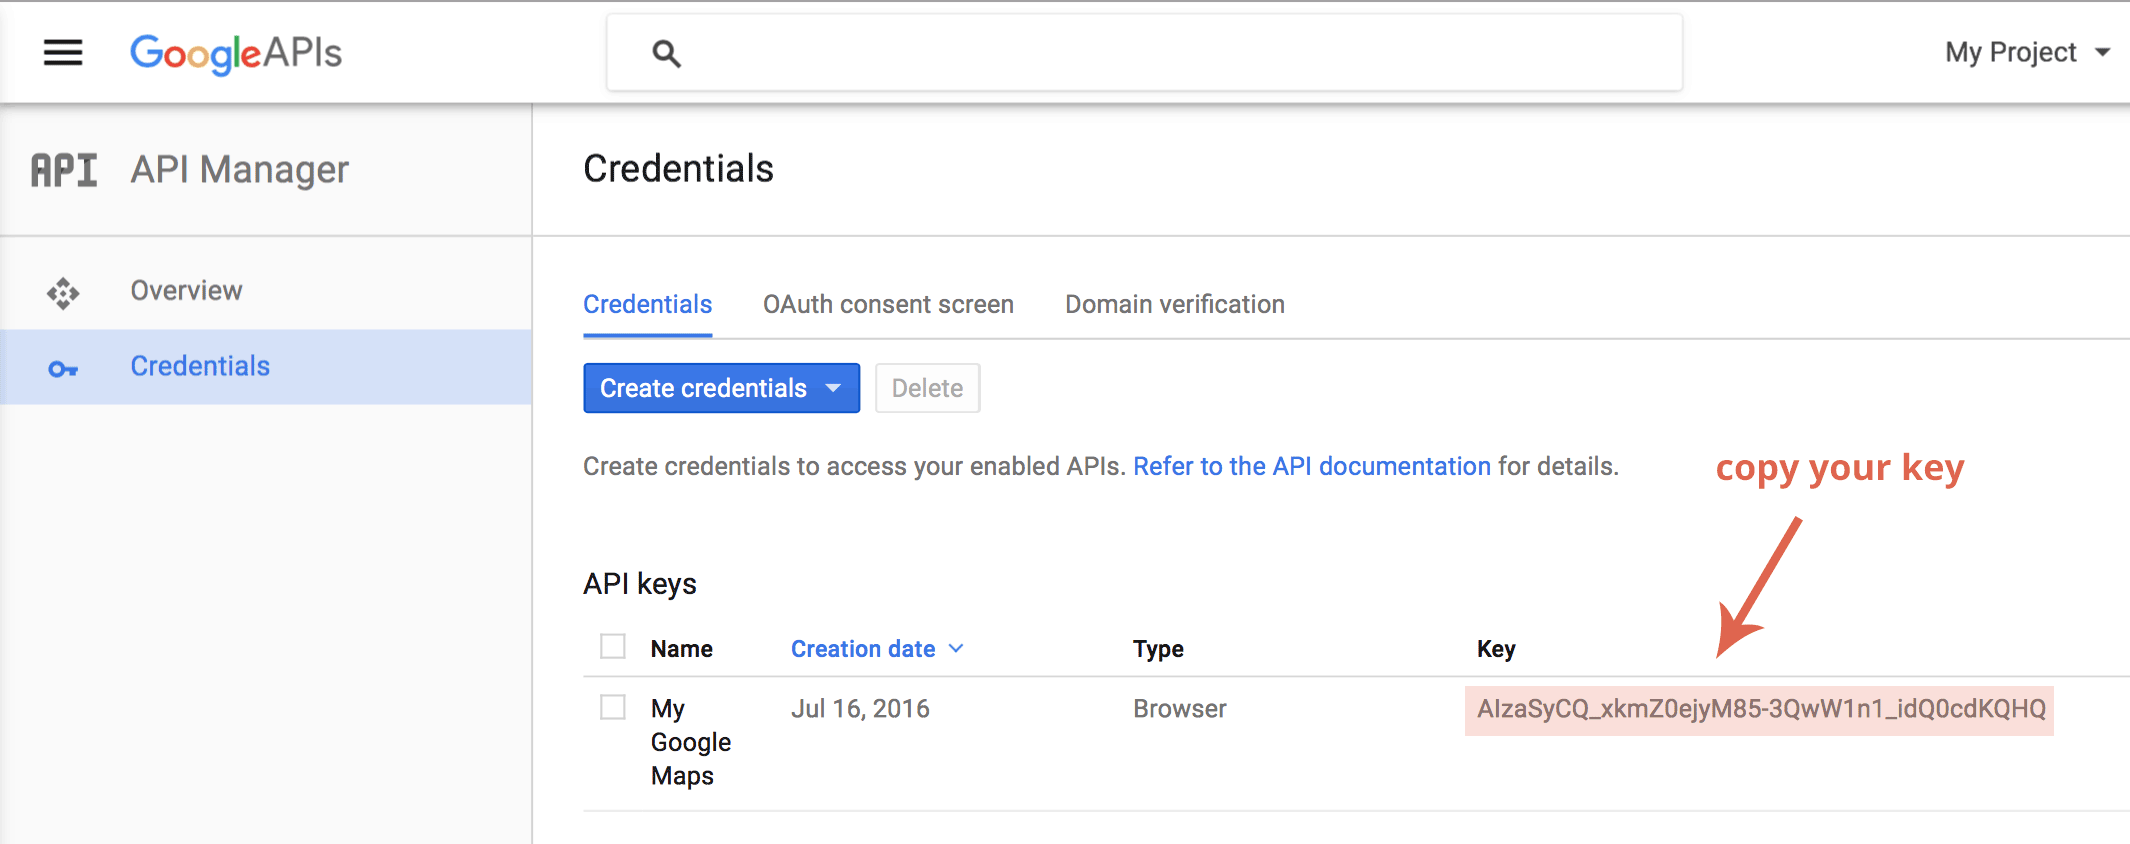
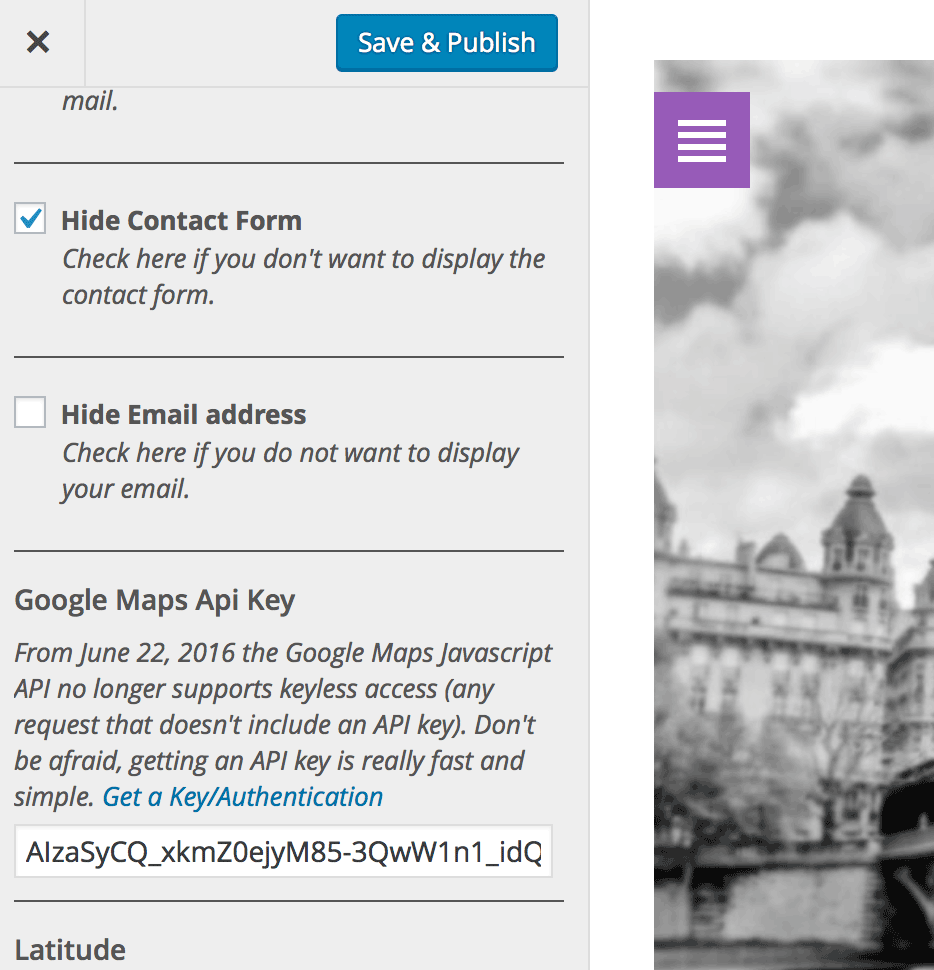
Copy your API key and paste into the Google Maps API key in Customizer > Panes Settings > Contact. Please note that it can take a few minutes for settings to take effect.
In order to display a maps on your site, you also have to provide the longitude and latitude coordinates of your location at the bottom of the Contact tab. If you don't know your coordinates, find them with Google Maps, for example on itouchmap.com/latlong.html
The CONTACT tab settings will be used in your "Contact Pane" - check the "Contact Pane" part.
-
Blog
Customize the meta date displayed for posts in archives (date, author and categories).
-
Fonts
With Panes you can use two custom font families: one for the body text and one for the headings.
Simply choose a Google Font for body from Google Font Directory.
While choosing the body font family make sure that the italic, bold and bold italic styles exist, see the image below:
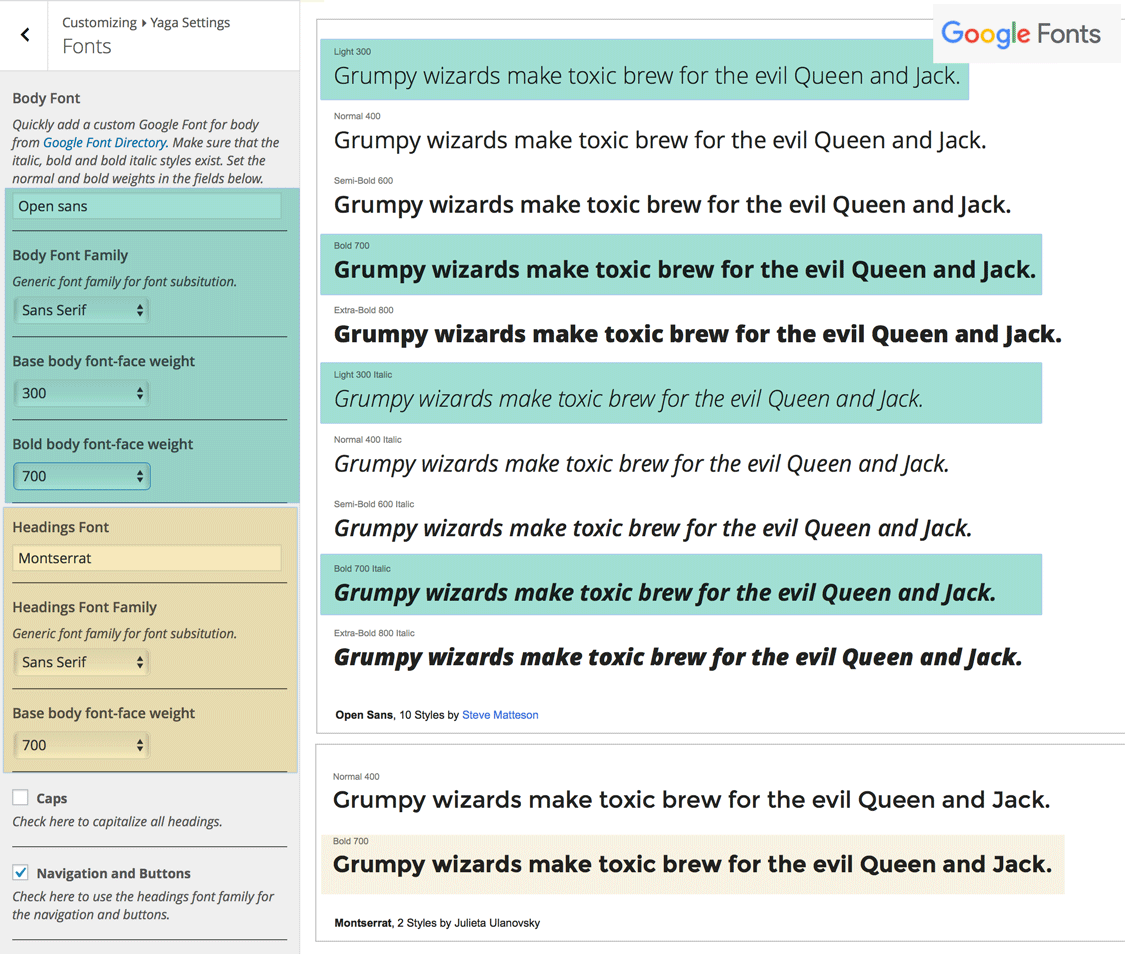
You can also decide to capitalize all the headings.
-
Colors
You can set custom colors for links and for links/buttons (in normal and hover state) and "more content" links.
-
Footer
You can modify the text displayed in the footer copyright area.
-
Social Links
There are 12 ready-to-use social network links built into the theme: Twitter, Google-plus, Facebook, Dribbble, Pinterest, Instagram, Flickr, Tumblr, Github, Linkedin, Vimeo and Youtube.
To activate any of them just paste the URL of your social profile. The social icons will appear in the left navigation sidebar and on the bottom of your contact tab.
-
Page 404
You can upload the full size background image for your 404 (Not Found) page.
-
Custom Css
You can add custom styles here. You might also consider (recommended) using the child-theme stylesheet instead.
Bilding your Site
Let's start to build your one-page website. It will be composed of all the "Panes" that you create in the WordPress interface. You define the order in which they appear in the Page Attributes meta box on your right. The pane with a higher order appears first.
Set your pane title in the Title field. Next go to the Pane Settings meta box below your text editor and set your pane subtitle, the shortened pane name to be displayed in the navigation menu together with the menu description.
Use the Pane Excerpt editor to add some pane-related introduction.
You can also choose one of the available icons to illustrate your pane content.
To add a background image, upload it as a Featured Image (meta box on your right). The images used in the demo are about 1500px x 800px and don't exceed 200kB. You can also set the background position that controls the way your background is scaled when you change the window size. You set it in the Pane Background Position field in the Pane Settings meta box below your text editor, the default value is center/center.
Whatever you type in the main text editor will be visible as the "read-more" content.

First - "Home" Pane
There is some specificity about the first "Home" pane. First of all note that your logo (or Site Title) will be displayed automatically.
Often you will not add any "read-more" content here - just don't put anything in your main text editor.
You don't need to set the pane subtitle - your site Tagline will be displayed instead.
You don't need to set the Menu Description - if you don't a little home icon will be displayed instead.
Also don't choose the icon - it will not be displayed in the first pane.
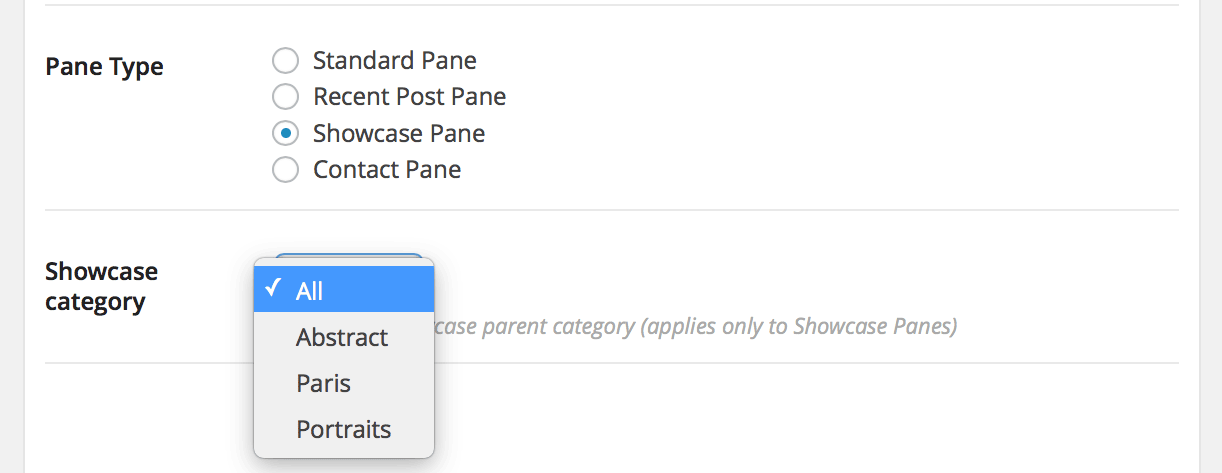
Showcase Pane
You can add a filtrable showcase of categorized items as one of your pane. Choose the Showcase Pane option in the Pane Type field. Next, choose the category of items you'd like to display. The direct child categories will be used as filters and the showcase will be automatically added to the "read-more" area.
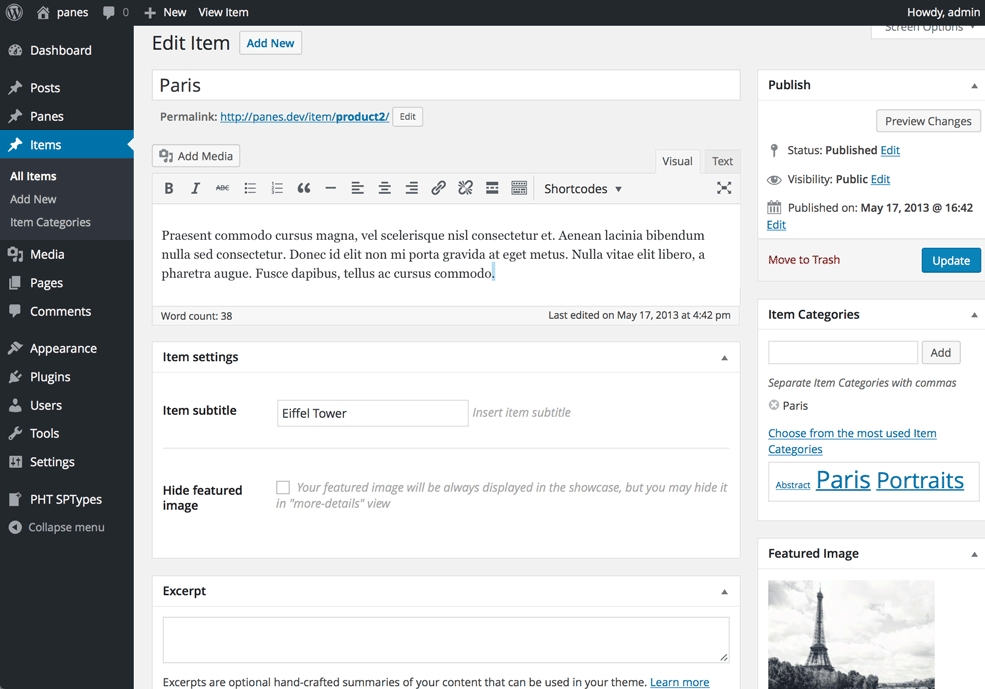
In order to add an Item, go to Items > Add New. Set the Featured Image - it will be displayed in the showcase. Set also the title and the subtitle. You can add some content in the main text editor - it will be loaded with ajax once an item is clicked.
In order to have filtrable showcases, add categories to your items.
Recent Post Pane
You can also display the last published post. Choose Recent Post Pane in the Pane Type field.
Note that if you want to add any of the available WordPress widgets, they will be displayed below the recent post in the Recent Post Pane.
Note that PANES Theme is not a typical blogging theme and it does NOT support comments.
Contact Pane
Choose Contact Pane in the Pane Type field to activate a Contact Pane. That will automatically add Google Maps, your address (see see this section) and social icons (see this section). Besides that you can add some content in the main text editor.
Navigation
The navigation menu is generated automatically. You may create your custom user menu in Appearance > Menus. It will be added below the automatic menu (doubled links to Panes will be deleted). Note that clicking on these links you will leave the one-pager.
Shortcodes
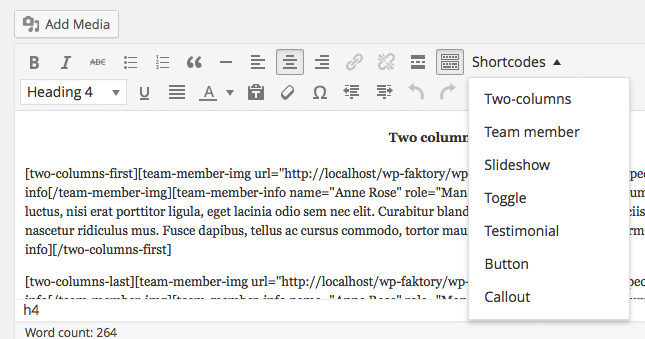
There are a few of custom shortcodes added to the template. If you are using the Visual editor, click on the "Shortcodes" button and select your desired shortcode from the dropdown menu - it will be added at your current cursor position.
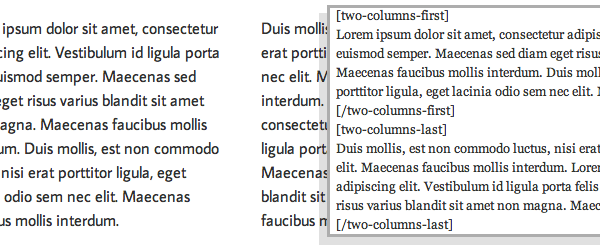
- Two-colums
-
Edit the First Column Content and Second Column Content between the related opening and closing tags.
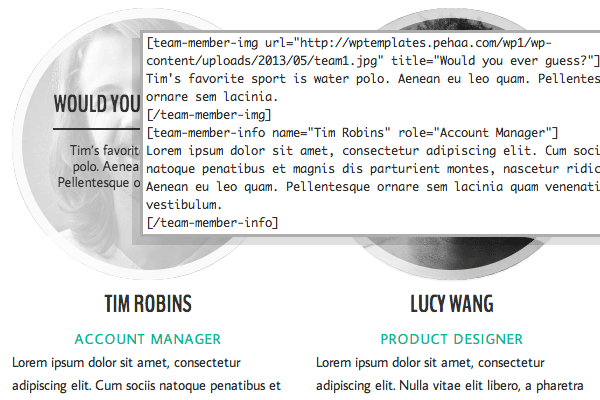
- Team member
-
Edit the url, title and content within the [team-member-img] tags and name, role and content within the [team-member-info] tags. Tip: It looks good when inserted as the two-columns content.
- Slideshow
-
There are four slides by default, but you can delete or copy-paste the [slide] tag. Edit the url and caption (may be left empty) parameters for each [slide] tag.
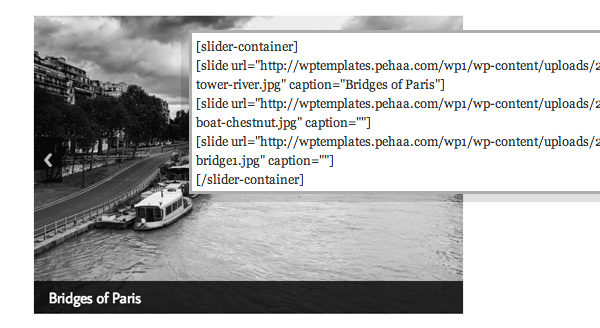
In version 1.1.3. we added two additional parameters to slide: is_inner_link and open_pane_after_scroll. Set "is_inner_link = true" if you want to add a link to another pane and open_pane_after_scroll="true" if you want that the "read-more"" content opens automatically, ie. [slide url="" href="#pane-59" is_inner_link="true" open_pane_after_scroll="true" title="View features" label="Click here"]Aenean lacinia bibendum nulla sed consectetur.[/slide]
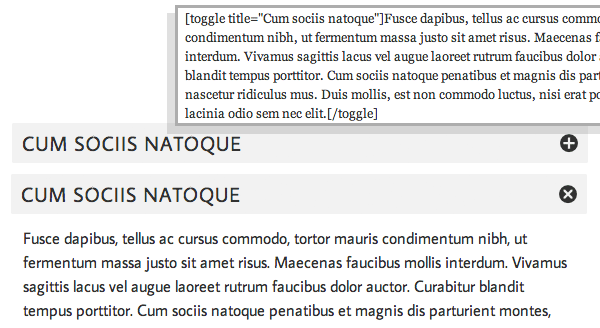
- Toggle
-
Edit the title parameter in the [toggle] tag and the content between the opening and closing tag.
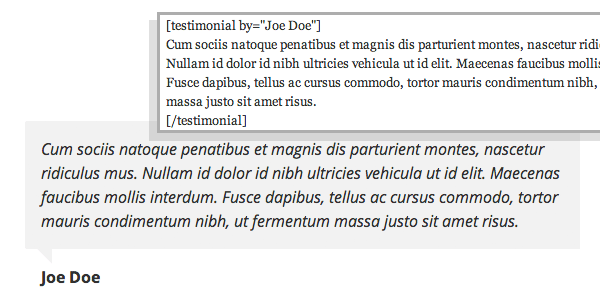
- Testimonial
-
Edit the by parameter in the [testimonial] tag and the content between the opening and closing tag.
- Button
-
Edit the url and label parameters in the [factory-button] tag. Note that the buttons have the same colors as links.
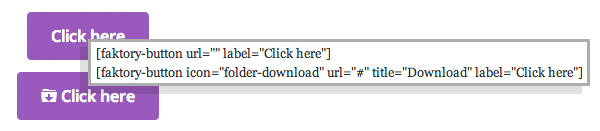
In version 1.1 we added two additional parameters to button: is_inner_link and open_pane_after_scroll. Set "is_inner_link = true" if you want to add a link to another pane and open_pane_after_scroll="true" if you want that the "read-more"" content opens automatically, ex. [faktory-button url="#pane-59" is_inner_link="true" open_pane_after_scroll="true" label="Click here"]
- Callout
-
Edit the url and label parameters in the [callout] tag as well as the content between the opening and closing tag.
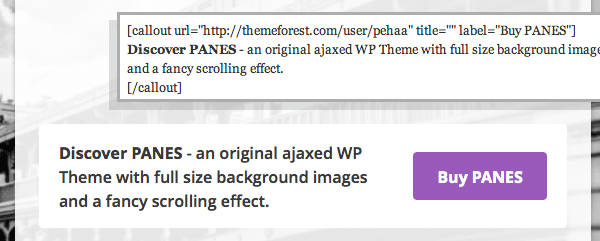
In version 1.1 we added two additional parameters to callout: is_inner_link and open_pane_after_scroll. Set "is_inner_link = true" if you want to add a link to another pane and open_pane_after_scroll="true" if you want that the "read-more content"" opens automatically, ex. [callout url="#pane-59" is_inner_link="true" open_pane_after_scroll="true" title="View features" label="Click here"]Aenean lacinia bibendum nulla sed consectetur.[/callout]
Miscellaneous
Translate Your Theme
Panes is translation-ready. You’ll find a faktorytheme.pot file in the /languages folder.
You can use POEdit to translate your theme. Once downloaded and installed go to File > Open and choose the languages/coollab.pot file in your theme folder. Line by line translate the theme to your language. Go to File > Save as.. and save your files in the languages folder in your child-theme. Name your file accordingly to WordPress language codes, you may find them here. For example the language code for French is fr_FR so you would save your file as fr_FR.po. Note that the fr_FR.po file will be automatically compiled to fr_FR.mo file.
If your are not using a child-theme you should save your .po/.mo files in the 'wp-content/languages/themes' folder. It this folder does not exist - you'll have to create it. You'll also have to prefix the .po, .mo files with the textdomain string, "faktorytheme-", for example the files for the french translation should be named faktorytheme-fr_FR.mo and faktorytheme-fr_FR.po
Make sure that WordPress knows which language you want to use. From WordPress 4.0 you don't need to edit the wp-config.php file to do that. Go to your Dashboard > Settings > Site Language choose your language and Save Changes.
Troubleshooting
Sometimes things do not work as they should…
Featured Images:
There are three image size variants used in this template, they are generated by WordPress during the image upload. If your images are already uploaded please use the Regenerate Thumbnails plugin, that will generate the missing sizes for you.
You don’t need this plugin if you start building your site with Coollab and you’ll upload all your images with Coollab being activated.
Theme styles not loading properly:
Panes theme minifies the css and javascripts files. If you are used a service like Cloudflare it may happen that the double minification of the css files causes problems. It's recommended that you only have one minify option turned on for your website.
In this case you should either turn off the css minification via your optimizationn service or enqueue the unminified css file.
Use a child theme and add the following block of code to coollab-child/functions.php:
add_filter( 'pehaathemes_main_stylesheet', 'not_minified_pehaathemes_main_stylesheet', 11 );
function not_minified_pehaathemes_main_stylesheet() {
	return 'style.dev';
}
Thank you. Please don't hesitate to contact us via our themeforest profile page.